Friday, November 29, 2013

Gelli Plate Prints for Christmas

Hello everyone,  I hope you are all doing well.

I got together recently with a friend to 'play' with our Gelli plates creating mono prints.    It's amazing how quickly you can create a pile of prints with Acrylic paints, stencils, self-made stamps and anything else that will make impressions.  

I created two cards for Christmas using mono prints in the background.  This first print doesn't have too much pattern which made it easier for over stamping.  I used Design by Ryn's beautiful Seaweed Set to create the 'icy branches' and the large Merry Christmas is from Chocolate Baroque's fabulous Bold Christmas Words set. 

I'm joining in at Crafts 4 Eternity's current challenge as the theme is Non Traditional Christmas design.


I started by stamping over the print several times with a seaweed branch using white pigment ink, which I embossed with clear.   Then I embossed the branch a couple of times with pink glitter and then with a blue/purple glitter powder.     Merry Christmas was stamped with dark blue and embossed with clear.

Stamps:  Designs by Ryn - Seaweed Set.  Chocolate Baroque - Bold Christmas Words.
Spellbinder Die:  Labels 4

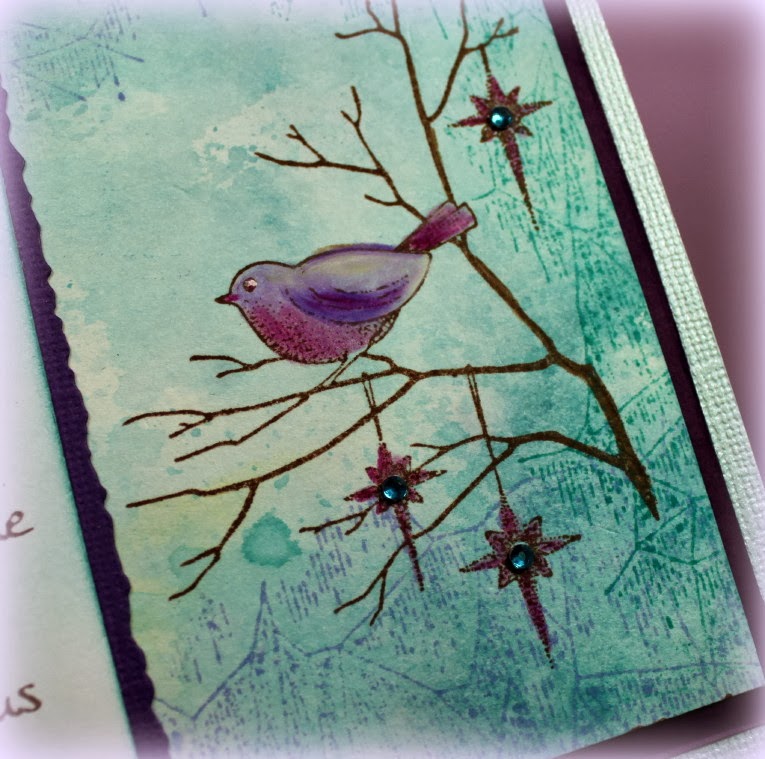
The background on the card below is much busier, but I decided to use it for a non-traditional Christmas design.  


I stamped over the background with Ryn's spiral branch with Dark Cobalt Archival Ink.  I coloured the leaves with a green Gelly Roll pen.    I added glitter to the stars that were in the background.

Stamps - Design by Ryn - Spiral Branch Set.   Penny Black - Christmas Cheer clear sentiment set
Dies - Heartfelt Creations - Sweet Juliet,  Spellbinder - Fancy Tags


Thanks for visiting and have a fabulous day!
Shirley

Wednesday, November 27, 2013

Winter Fairy and Snow

Hello everyone, I hope you are doing well.  We woke up this morning to a winter wonderland -  we have lots of snow, it's very pretty, but quite early in the season!  

I have another fairy design today from Chocolate Baroque's new Winter Fairy Collection and it's starting to snow on her.   I guess fairies don't need warm clothing :)  


The beautiful fairy is from January Fairy and the tree is from February Fairy.   I also used the snowflake edge from Winter Edges.  I love how Chocolate Baroque's beautiful stamp sets work so well together.   The designer is very talented. 

I used blue design paper from my stash that actually has a wood grain pattern, but I liked the colour for the sky.   I did all the stamping with Rich Cocoa Memento Dye Ink and colouring with Prisma Pencils.  I masked the fairy before stamping the trees and 'ground'.    I stamped the bottom part of the snowflake edge on the ground and coloured it in.   I used puff paint for the snow.

Thanks for visiting and have a great day
Shirley

Saturday, November 23, 2013

Christmas Spiral Branch and Tutorial


Hello everyone, I hope you are doing well.  I would like to welcome the new followers and again thank everyone for your visits and kind comments.  You make blogging very enjoyable :)

I had the thought that Designs by Ryn's new beautiful Spiral Branch would make a nice background for a Christmas design.  And then I saw Bianca created a beautiful Christmas card using it, which you can see here at this post.   She inspired me to almost immediately create this card :)  I've also included a tutorial on how I created the background.


Click for a larger photo

The background was created with Broken China, Mowed Lawn and Peacock Feathers Distress Ink using the Acrylic Block Technique (but I used a small plexi glass sheet).    I did all the stamping with Cobalt Blue Archival Ink.   I coloured the leaves with several Gelly Roll pens, two are sparkly.  I used Sapphire DI around the edges.   I die cut the flowers that have a snowflake shape from white cardstock and coloured by blending Distress Inks over them. 

Stamps:    Designs by Ryn, Spiral Branch
                Chocolate Baroque, Bold Christmas Words
Dies:        Crealies, CL CF 18

I promised to create a tutorial using Distress Inks with an Acrylic Block, so I've taken photos of the steps.   I apologize for the quality of the pictures, it's hard to work with one hand and photograph with the other.  I don't have a tripod and probably a video would be better.

Here are the steps I took to create the background:


You need:  Distress Inks -  Broken China, Mowed Lawn and Peacock Feathers, Spray Bottle & Water (with a light mist), Card stock - I used 140lb Mixed Media paper with Vellum Coating, Acrylic Block or Plexi Glass plate.   I always work over a Craft Mat and mine has pit marks from a table that is not smooth, but it still works fine.

I use the plexi glass plate as it gives me a bit more room for ink
Add ink direct from ink pad to the glass plate (or acrylic block)
I've placed a large sheet of white cardstock under the glass just for photograph purposes so you can see the ink  (NOTE:  I am NOT using a Gelli plate here)
Here you can see I've misted the ink
I've placed my cardstock on the glass with the wet ink and I move it around a little
I've turned it over so I can see the ink (but you don't have to, if you like a surprise)
Again I move the glass sheet around a little to spread the ink
I've removed the glass plate

Dry with a heat gun (or air dry)
When dry, I added the remaining ink that was left on the plate which will give a splatter look (similar to the wrinkle free technique using your craft mat).  If you don't want splatters or drip marks, skip this step.

I've used all the ink that I had on the plate, I could have added more at the start.   I want more ink around the parameter and decide to add more Broken China Distress Ink with the glass plate
I add the ink to the plate and mist again
I've placed the cardstock onto the plate and move around the parameter
I've turned it over to see what I'm doing :)
I remove the plate, dry and trim to the size I want to work with
I enjoy using this technique, the results are never the same.   If this is new to you and want to give it a try, just play and have fun to see what results you get.  

Glenda, the owner of Chocolate Baroque has posted informative tutorials at their website.    She included a great lesson using the acrylic block with various inks and you can see it here.

Below is a close up of the finished card.   


Thanks for visiting and enjoy your weekend,
Shirley

Friday, November 22, 2013

Masculine Birthday Greetings

Hello everyone, I hope you are doing well.

I have a card design today that I think works well for a man using stamps by Chocolate Baroque including their new fabulous Nature Fragments set.


The background was created with Melted Chocolate (how appropriate) Dylusions Ink.   I stamped using two tree trunk wood grain fragments from Nature Fragments with Gathered Twigs Distress Ink.     I embossed two trees from Fantasy Woodland and sentiment from Birthday Words with brown powder.   I blended Broken China Distress Ink over the trees and label.   

Die:  Spellbinder - Elegant Labels 4 S6-005

Thanks for your visit and have a great day,
Shirley

Thursday, November 21, 2013

'Door' to my Garden

Hello everyone

Art Journal Journey's theme for November is 'Doors'.  I have not had much time to work in my Art Journal this month but I did manage to create this page a couple of weeks ago.  I wasn't all that happy with the result but I've decided today to go ahead and post it to participate.

The arch represents the arbor in one of our back gardens (we have many gardens) and I used images from Chocolate Baroque to add the 'garden'.   The arch is the door to our peaceful sanctuary.


The background is Dylusions Inks and I used light molding paste with TCW Spinning Tops stencil.  I also used DI ink with TCW Solace stencil.   I used Neocolour II crayons to paint the archway.

Chocolate Baroque stamps:  Nature FragmentsArtistic Expressions, Wisteria Lane, Floral Edges,


Thanks for stopping by and have a great day!  
Shirley

Tuesday, November 19, 2013

Joy in a Rain Forest

Hello everyone  I hope your week is going well.

I have a card today using Designs by Ryn stamps including her new Striped Reed Set.   This 'scene' makes me think of being in a warm Rain Forest :)


The background was created using the Acrylic Block technique using Squeezed Lemonade, Mowed Lawn and Peacock Feathers Distress Inks.   I stenciled with TCW Starfall using Peacock Feathers DI and then with TCW Circle Explosion using white Acrylic craft paint.

Next I stamped the Striped Reeds (I used all three from the set) with Mowed Lawn DI.  The reed set is unique in that the two larger branches will fit together when stamped close or you can use them separately.

I over stamped using one of the smaller cluster of raindrops from the amazing Rain Drop Set with black ink, coloured a little and highlighted with a white Gelly Roll pen.  JOY is from the wonderful Artistic Expressions set by Chocolate Baroque. 

Finally I stamped Tsuki the moth, with black Archival Ink on watercolour paper, coloured with my Tombow markers, cut out and attached.  I added a little glitter and highlights as well.

Here is a look at the Striped Reed Set.


Thanks for stopping by and have a great day!
Shirley

Sunday, November 17, 2013

Winter Fairies for Christmas

Hello everyone, I hope you are having a great weekend.  I would like to welcome the new followers and again thank everyone for your visits and kind comments, they are very much appreciated!

Chocolate Baroque has recently launched their new beautiful Winter Fairy Collection.   I have a couple of designs today featuring stamps from these sets.  I used images from December Fairy for the card below.


The background was created with Calypso Teal, After Midnight and White Linen Dylusions spray inks and I sprinkled a little salt while wet.   I stencilled a little over the background using Circle Explosion by TCW.   I stamped the angel with Seedless Preserves Distress Ink, embossed with clear, cut it out, matted and coloured a little with Dylusions inks.     I added snowflake die cuts from Impression Obsession which were generously given to me by a kind friend.

Next is a beautiful Fairy from February Fairy.


I created the background with Festive Berries Distress Ink using an Acrylic Block.   I stamped the trees from Reindeer Landscape with Festive Berries DI.    I embossed the holly edge from Christmas Edges and Believe from Reindeer Landscape with gold.  The Fairy is also embossed with gold, coloured with Tombow markers, cut out and attached.  I added Diamond Stickles to her wings and dress.

Here is a look at the Winter Fairy Collection which is available in three individual sets or as a multi buy special.


If you have a chance, please visit Chocolate Baroque's Design Team blog to see what my talented teammates are creating.

Thanks for visiting and have a great day!
Shirley

Friday, November 15, 2013

Fantasy Meadow Flower

Happy Friday ! 

I have another 'blue' card today featuring a gorgeous flower from Chocolate Baroque's beautiful Fantasy Meadow set which is the stamp of the week, starting today.    I've had this set for quite a while, it's another favourite.   I've also used a fragment in the background from the new fabulous Nature Fragments set.


The background is again with one of my favourite Dylusions inks blue colour combo.     I picked up droplets of ink from my craft mat to create more texture:)   I blended Picked Raspberry DI over TCW Chicken Wire stencil and then stamped with a fragment from Nature Fragments.   I coloured the flower with Prisma Pencils and added Stardust Stickles to the centers after the card was assembled.   

Here is a look at the complete A5 Fantasy Meadow set that is the stamp of the week (on sale!). 


Thanks for visiting and have a great weekend,
Shirley

Wednesday, November 13, 2013

A Sweet Robin for Christmas

Hello everyone, I hope you are doing well.

I have a couple of designs today using stamps from Chocolate Baroque - their new fabulous Nature Fragments and another favourite, Christmas Song.


The background was created with Peacock Feathers & Picked Raspberry Distress Inks using the Acrylic Block technique.   I over stamped with the Ice Fragment from Nature Fragments with the same Inks.     The Robin from Christmas Song was stamped with Cocoa Memento Ink and coloured with Inktense Pencils.   I added glitter and rhinestones and died sheer ribbon with Raspberry Ink to match.


And here is another one with the same little Robin:


I used Peacock Feathers Distress Ink and Acrylic block for the background.  I over stamped with the Ice Fragment with both Shaded Lilac and Peacock Feathers Distress Ink.   The poem (also from Christmas Song) and Robin were again stamped with Cocoa Memento Ink.   I coloured the Robin with Prisma Pencils.   


Thanks for stopping by and have a great day!
Shirley

Monday, November 11, 2013

Love with Flowers

Hello everyone and Happy Monday.  

I have a couple of cards today that feature layered flowers, using new stamps by Designs by Ryn.   Love is by Chocolate Baroque.  In the first Fall themed design I used the 3 leaves from Ryn's Abstract Leaf set to create a large flower.


I stamped Ryn's Leafy Branch with Spiced Marmalade Distress Ink on a sheet of  orange Basic Grey paper that has a bit of pattern to create the background.   Next I coloured a sheet of mixed media paper with Dried Marigold DI using an Acrylic Block & water.   I then stamped each of the 3 different sized Leaves from the Abstract Leaf set five times with Kaleidacolor- Creole Spice, Rainbow Dye Ink.   I sponged a little Spiced Marmalade DI on the largest and smallest leaves.   I cut the 15 leaves out to arrange into a flower.  I turned the middle sized leaf inward to create a variance in the 'petals'. 

Love is from Chocolate Baroque's Artistic Expressions set.  A great word set that I use a lot. 

The deep plum Leaf branch die cut is Memory Box - Fresh Foliage

Here is a look at the Abstract Leaf Set I used to create the flower:


With a completely different colour combo I used Crealie die cut flowers with Ryn's Ornate Leaf set (3 different sizes in the set).


I used a sheet of mauve Basic Grey paper and stamped with Impression Obsession's Cover a Card - CAC018 Greenery  with black a couple of times.   I used the leafy pattern stamping to die cut some of the petals along with using a mauve sheet without stamping.     I stamped the Leafy Branch with pink ink on white cardstock for background.   I stamped the medium size Ornate Leaf on the mauve Basic Grey paper, cut them out, dry embossed them on the back to create dimension, and highlighted with a white pen.
 

Die Cuts:  Crealies (flowers) CL CF 20 and Memory Box -Winterberry Sprig


Thanks for your visit and have a great day,
Shirley

Saturday, November 09, 2013

Nature Fragment with a Butterfly

Hello everyone, I hope you are enjoying the weekend.

I have a card design today using the new Nature Fragment set from Chocolate Baroque along with a pretty butterfly from Butterfly Daisy Collage and sentiment from Birthday Words.


The background is watercolour paper that I used to 'mop up' inks from a previous card.    It's actually the watered down version of the Blue cards you saw last month :)   I spritzed a little water and added a little sea salt that created the spots.   When dry I stamped with the flourish fragment from Nature Fragments using Peacock Feathers Distress Ink.

I embossed the Butterfly from Butterfly Daisy Collage with Silver, cut it out and attached.   When the card was finished I added stickles.   The matting and die cuts are in dark brown (hard to tell in the photo) and I stamped the greeting with brown Dye Ink.

Dies used:    Cheery Lynn- Cuties 1 B149 (border which can be made into a flower) and Mini Flourish One B170.


Thanks for your visit !
Shirley

Tuesday, November 05, 2013

Life is Beautiful

Hello everyone, I hope you are doing well.

I have a card today featuring stamps by Designs by Ryn, including her new Compound Leaf that has a wonderful textured pattern.  This makes me think of summer... it's not here..... it's been colder than normal..........brrrrrrrrrrrrrrr.  


Design by Ryn stamps:  Compound Leaf, Leafy Branch (at the top) and the beautiful Dragonfly Faerie.

"Life is Beautiful" is from the 2012 Art Specially Show in the Netherlands. 

The background was created with Squeezed Lemonade,  Peacock Feathers & Mowed Lawn Distress Inks using the Acrylic Block technique.  I stamped the Compound Leaf with Caribbean Sea Kaleidacolour Ink (using the darker colours on the pad).   I stamped Leafy Branch & the sentiment with Cottage Ivy Memento Ink.

I stamped Dragonfly Faerie on separate cardstock with black, coloured with Prisma Pencils, cut her out, added glitter to her wings and attached.  I added highlighting with a white Gelly Roll pen.


Thanks for visiting and have a wonderful day,
Shirley

Sunday, November 03, 2013

Fall Colours with Texture

Hello everyone, I hope you are doing well.

It's hard to believe but here we are into November already.    I made this card when the Fall colours were in their prime,  which inspired this design.     All stamps are by Chocolate Baroque including their new Abstract Fragments.  


Chocolate Baroque Stamps sets used:    Abstract Fragments, Gothic Fragments, Fancy Flourishes, Butterfly Daisy Collage and Artistic Expressions.

I also used Crealie- CL CS 24 die cuts and TCW Stencil - Cubist.

The background is Marmalade, Mustard and Wild Honey Distress Inks using the Acrylic Block technique.   I added the cube design with the TCW Cubist Stencil and Wild Honey Distress Ink.   I stamped 'Art' and the Flourish from Fancy Flourishes at the bottom with Walnut Distress Ink.    I stamped the bricks from Abstract Fragments and Window from Gothic Fragments with Rusty Hinge Distress Ink.

Next I embossed the flowers from Butterfly Daisy Collage with Copper on purple designer paper, cut them out, attached them to the background with the Crealie die cuts and added metal medallions that were hanging out in my stash.

Here is a look at the new A4 (full page) rubber stamp sets Abstract and Nature Fragments. They are on special offer for the month of November and also available as a multi-buy special.   They are fabulous stamps that I will use over & over for backgrounds and more.

And below is a photo from a section of our back garden in the Fall of 2012.    I haven't managed to take an updated version, but we still have a lot of leaves on our trees.


A wonderful blog buddy - Donna from Creative Smiles sent me my new header using this photo.  What a nice surprise as I have not learned how to create a nice header.  Thank you Donna!


Thanks for your visit and have a great day!
Shirley