Hello everyone, I hope your week is going well.
I was honoured this week by Zoe at Zoeblingcards with the Liebster Blog Award. If you have a chance, please visit Zoe's Blog to check out her beautiful creations. This is the fifth time I've received this award & I'm thrilled that fellow bloggers have chosen me. The idea behind this award to pass it on to 5 other blogs that you enjoy visiting & who have less than 200 followers. I've already passed it on so I cannot chose again, it's too difficult.
I would like to welcome the new followers and visitors that stop by. Blogging would not be so much fun without you, thank you for your support.
I have several cards today using stamps from the Fantasy Woodland set by Chocolate Baroque. I used different images & techniques for each one. There are so many wonderful images in this set and I've had fun 'playing' with them.
This first card is a mixed media design and I've joined into the "Use Stamps" Challenge over at Addicted to Stamps & More.
I used Dylusions Inks (red & purple) to create the background on the card above.
I also used Acrylic paints, Modelling Creme & Stickles with TCW
Circle Explosion & Dylusions Luscious Leaves Stencils. The tree is from Fantasy Woodland which I stamped with black Stazon.
I got my Pan Pastels out which blend so beautifully for this next card.
I blended the Pan Pastels to create the 'mood' behind the trees. I also added a little design with TCW's Mini Solace stencil and Distress Ink. I stamped the delicate trees from the Fantasy Woodland set along with the quote from Words of Inspiration (an awesome little set) with black Versafine Ink.
And for the card below I've changed up the colour combination and used Smooch Inks.
The background was created using Pool, Lime & Ocean Smooch Inks. For a description of the technique please see my blog post here. I embossed one of the small trees from Fantasy Woodland with gold to create leaves in the background. The main tree image was also embossed with gold & I blended Smooch ink to colour. I embossed a 2nd one to decoupage. The die cut is Spellbinder S5-062 and the small piece under the Owl charm is S5-063.
The photo does not do the Owl charm justice, he has lots of bling that it hard to see.
Well that's all for today !
Thanks again for stopping by,
Shirley
Showing posts with label Background Smooch Ink. Show all posts
Wednesday, February 27, 2013
Sunday, December 16, 2012
Christmas Flourish with Holly
Hello everyone, I hope you are having a great weekend with all the activities at this time of year.
The beautiful Christmas Flourish stamp set from Chocolate Baroque is on special this week ! The beautiful flourishes are quite elegant (see photo at bottom of this post). I have two cards today created with these designs, one with lots of gold and the other a CAS one layer card.
I used blended Taffy (pink) & Snickerdoodle (warm beige) Smooch Inks to create the background. Next I stamped CB's Holly Snowflake (free stamp with December's Craftstamper Magazine) with Colorbox Gold Pigment ink. I embossed the Holly background with gold and embossed the sentiment with a Rose powder. The 'Believe in the Miracle' sentiment is from the Snowflake Flourish set, but it's also available as a single clear stamp.
I blended Snickerdoodle Smooch Ink around both the Holly background and the sentiment. I used Spellbinder's S5-090 die for the mat behind the quote. A matching bow, pearls, matting and it's done! The layers could be popped up but I left them flat for easier mailing.
And below is a one layer CAS design using the large Holly Flourish from the set which was so quick & easy to make ! I love to use layers & decoupage, but ouch it gets expensive at the post office! The flourishes are wonderful for clean & simple creations.
I used beautiful smooth purple card stock available at Crop Circles. I embossed the gorgeous Holly Flourish & sentiment with white and added red stickles for the 'berries'.
And below is the awesome Christmas Flourish set. The trees will also make great cards !
Thanks for your visit and enjoy your day !
Shirley
The beautiful Christmas Flourish stamp set from Chocolate Baroque is on special this week ! The beautiful flourishes are quite elegant (see photo at bottom of this post). I have two cards today created with these designs, one with lots of gold and the other a CAS one layer card.
I used blended Taffy (pink) & Snickerdoodle (warm beige) Smooch Inks to create the background. Next I stamped CB's Holly Snowflake (free stamp with December's Craftstamper Magazine) with Colorbox Gold Pigment ink. I embossed the Holly background with gold and embossed the sentiment with a Rose powder. The 'Believe in the Miracle' sentiment is from the Snowflake Flourish set, but it's also available as a single clear stamp.
I blended Snickerdoodle Smooch Ink around both the Holly background and the sentiment. I used Spellbinder's S5-090 die for the mat behind the quote. A matching bow, pearls, matting and it's done! The layers could be popped up but I left them flat for easier mailing.
And below is a one layer CAS design using the large Holly Flourish from the set which was so quick & easy to make ! I love to use layers & decoupage, but ouch it gets expensive at the post office! The flourishes are wonderful for clean & simple creations.
I used beautiful smooth purple card stock available at Crop Circles. I embossed the gorgeous Holly Flourish & sentiment with white and added red stickles for the 'berries'.
And below is the awesome Christmas Flourish set. The trees will also make great cards !
Thanks for your visit and enjoy your day !
Shirley
Thursday, December 06, 2012
Celebrating the Holidays
Hello everyone ! I hope your week has been going well. It's hard to believe that Christmas is getting close !
I created this card for the challenge at Impression Obsession. I've used whimsical stamps that are designed by Hannah Davies. I thought these two love birds look like they are celebrating the holidays together as the challenge is 'celebrating the holidays' . And for a change I've used red & green (& blue) !
Impression Obsession Stamps: Snowflake C10003, Birds on Holly F10002, & Merry Christmas B10011.
Spellbinder Die: S4-366
I created the background with Pool, Azure & Silver Smooch Inks. I over stamped with the snowflake using Smokey Gray Versafine Ink.
I embossed the cute Birds on Holly and Merry Christmas with Black and used my Tombows to colour. I stamped on watercolour paper so I could use a brush with water direct to the paper. I added stickles for highlights.
Thanks for stopping by and have a great day !
Shirley
I created this card for the challenge at Impression Obsession. I've used whimsical stamps that are designed by Hannah Davies. I thought these two love birds look like they are celebrating the holidays together as the challenge is 'celebrating the holidays' . And for a change I've used red & green (& blue) !
Impression Obsession Stamps: Snowflake C10003, Birds on Holly F10002, & Merry Christmas B10011.
Spellbinder Die: S4-366
I created the background with Pool, Azure & Silver Smooch Inks. I over stamped with the snowflake using Smokey Gray Versafine Ink.
I embossed the cute Birds on Holly and Merry Christmas with Black and used my Tombows to colour. I stamped on watercolour paper so I could use a brush with water direct to the paper. I added stickles for highlights.
Thanks for stopping by and have a great day !
Shirley
Wednesday, December 05, 2012
A Stylized Tree that is published !
Hello everyone - I hope your week is going well. It's snowing here this morning which actually looks pretty. But it's brrrrrrrrrrrrr cold.
More excitement for me this week ! One of my card designs was published in the Canadian Scrapbookers Basics, Volumne 6, Magazine that was released on December 1st. This magazine covers stamping techniques by Cathie Allen, it's an excellent reference and my design is printed in the Stamp Smoosh section.
This is the card using Design by Ryn and Impression Obsession Stamps.
The background was created using Pool & Sugarberry Smooch Inks. If you would like information on creating Smooch Ink backgrounds, I have a Tutorial at this Post.
I over-stamped the background with the small tree from Ryn's Stylized Tree Set with Colorbox Boysenberry Pigment ink and then stamped again using Ryn's Snowflakes (hard to see in the photo) with Brilliance Platinum Ink randomly over the background.
The large tree from Ryn's Stylized Tree Set was stamped with Boysenberry and embossed with clear. I cut it out, blended more Pool Smooch Ink around and created a mat behind it. Christmas Magic B3585 is from Impression Obsession.
Thanks for stopping by and have a great day !
Shirley
More excitement for me this week ! One of my card designs was published in the Canadian Scrapbookers Basics, Volumne 6, Magazine that was released on December 1st. This magazine covers stamping techniques by Cathie Allen, it's an excellent reference and my design is printed in the Stamp Smoosh section.
This is the card using Design by Ryn and Impression Obsession Stamps.
The background was created using Pool & Sugarberry Smooch Inks. If you would like information on creating Smooch Ink backgrounds, I have a Tutorial at this Post.
I over-stamped the background with the small tree from Ryn's Stylized Tree Set with Colorbox Boysenberry Pigment ink and then stamped again using Ryn's Snowflakes (hard to see in the photo) with Brilliance Platinum Ink randomly over the background.
The large tree from Ryn's Stylized Tree Set was stamped with Boysenberry and embossed with clear. I cut it out, blended more Pool Smooch Ink around and created a mat behind it. Christmas Magic B3585 is from Impression Obsession.
Thanks for stopping by and have a great day !
Shirley
Sunday, November 18, 2012
A Pair of Silver Chocolate Pears
Hi everyone ! Hope you enjoyed your weekend.
I have another Christmas card to share today ! All of the images are from the beautiful Pears & Baubles set by Chocolate Baroque. I love this set, it includes so many beautiful stamps to create a variety of cards.
I created the background by blending Pool, Azure & Silver Fox Smooch Inks. After making sure it was dry (I used my heat gun to help speed drying) I over stamped and embossed the pretty tree with silver.
On separate card stock I also embossed the two pears with silver. Using the Acrylic Block technique I added Peacock Feathers & then blended Picked Raspberry Distress Inks to add color. Pink added to blue created the purple. I also used the wet ink to dye white gauze ribbon to match.
I stamped Happy Christmas with Midnight Colorbox Pigment Ink, embossed with clear and then blended the same two DI over top. I also blended a little Picked Raspberry DI around the edges of the background.
My post with a tutorial to create backgrounds with Smooch Inks is here.
Thanks for stopping by and have a great day. I hope to 'see' you here again soon !
Shirley
I have another Christmas card to share today ! All of the images are from the beautiful Pears & Baubles set by Chocolate Baroque. I love this set, it includes so many beautiful stamps to create a variety of cards.
I created the background by blending Pool, Azure & Silver Fox Smooch Inks. After making sure it was dry (I used my heat gun to help speed drying) I over stamped and embossed the pretty tree with silver.
On separate card stock I also embossed the two pears with silver. Using the Acrylic Block technique I added Peacock Feathers & then blended Picked Raspberry Distress Inks to add color. Pink added to blue created the purple. I also used the wet ink to dye white gauze ribbon to match.
I stamped Happy Christmas with Midnight Colorbox Pigment Ink, embossed with clear and then blended the same two DI over top. I also blended a little Picked Raspberry DI around the edges of the background.
My post with a tutorial to create backgrounds with Smooch Inks is here.
Thanks for stopping by and have a great day. I hope to 'see' you here again soon !
Shirley
Wednesday, November 07, 2012
Smooch Background Tutorial and another Heart of Lights
Hello everyone, I hope you are having a great week. It's crispy cold here in Ontario, cooler than normal, but we enjoyed sunshine today.
I've had another 'play' with Designs by Ryn's beautiful Heart of Lights and Celtic Star Set. Again the heart design is very unique as the 'wires' from the Christmas Lights have been drawn into a Celtic Heart.
I've been asked frequently for instructions to create Smooch backgrounds so I've included a photo tutorial today.
I embossed the Heart of Lights with black and blended Distress Inks around the image (Milled Lavendar, Shaded Lilac and Dusty Concord). I used a black Distress Marker around the outside edge after cutting it out with the heart die (Nellies Multi Frames - MFD 022). I colored the Celtic Heart of Lights with Smooch Inks using the little applicator and added Glossy Accents to create dimension.
The quote is from Impression Obsession (C3505 Miracle).
I used Grape Soda, Sugarberry & Pool Smooch Ink. The bottles may look small, but they seem bottomless. I've been using the same ones for 2 1/2 years except "Pool" which I've replaced as I use it the most.
I always use a non-stick craft mat under my work. (mine is well used and has spots from using over a rough surface, but it's still fine). You will need Versamark ink, Smooch inks, Colorbox stylus with the black moldable tip and smooth white cardstock. I use paper intended for Copic markers. Baby wipes work well to clean up the applicator after you are done.
Cover the white cardstock with Versamark Ink direct from the pad. This keeps your surface 'wet' to allow you to blend the inks as they dry quickly.
Start with your lightest colour, Grape Soda. Shake the bottle well and add the ink using the applicator direct to the stylus.
You need about this much on your stylus.
Start adding to your paper by blending in circle motions. I leave white spaces for the next color to 'grab'.
I added Sugarberry next. This is the darkest but since Pool (blue) is an accent, I used it last. I don't clean my applicator between colors.
This is what my sheet looked like after adding the second color (Sugarberry).
This is what my background looked like after adding the third colour (Pool). Smooch Inks have a beautiful sheen as it catches the light. The colors are not showing true in this photo, it's much more purple.
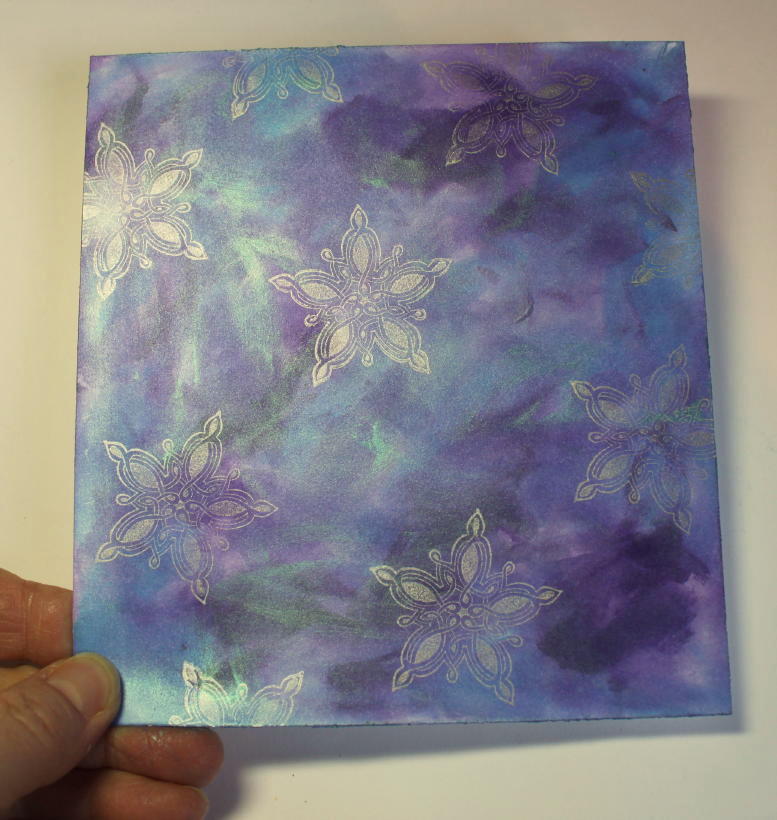
Next I stamped with one of the stars in Ryn's Celtic Star Set using Brilliance Platnium Planet Ink over the background.
Then I stamped the star over the background using Versa Magic Perfect Plumeria Chalk Ink. And above is the finished background. Certainly not traditional Christmas colors.
I stamped the quote direct to the background with black Stazon Ink. After this was done, I wished I had embossed it so that it stands out more. I added the heart, ribbon and mats.
If you have any questions, please leave me a comment and I'll reply on the comment page. I find that if I leave my email address on my blog, I get too much 'wierd' Spam. I won't talk about what kind I've received.
If you get a chance, please stop by Miranda's and Eileen's Blog who are also on Ryn's Design Team. They have beautiful blogs with lots of inspiration.
Thanks for stopping by and have a great day !
Shirley
I've had another 'play' with Designs by Ryn's beautiful Heart of Lights and Celtic Star Set. Again the heart design is very unique as the 'wires' from the Christmas Lights have been drawn into a Celtic Heart.
I've been asked frequently for instructions to create Smooch backgrounds so I've included a photo tutorial today.
I embossed the Heart of Lights with black and blended Distress Inks around the image (Milled Lavendar, Shaded Lilac and Dusty Concord). I used a black Distress Marker around the outside edge after cutting it out with the heart die (Nellies Multi Frames - MFD 022). I colored the Celtic Heart of Lights with Smooch Inks using the little applicator and added Glossy Accents to create dimension.
The quote is from Impression Obsession (C3505 Miracle).
Creating backgrounds using Smooch Ink:
I used Grape Soda, Sugarberry & Pool Smooch Ink. The bottles may look small, but they seem bottomless. I've been using the same ones for 2 1/2 years except "Pool" which I've replaced as I use it the most.
I always use a non-stick craft mat under my work. (mine is well used and has spots from using over a rough surface, but it's still fine). You will need Versamark ink, Smooch inks, Colorbox stylus with the black moldable tip and smooth white cardstock. I use paper intended for Copic markers. Baby wipes work well to clean up the applicator after you are done.
Start with your lightest colour, Grape Soda. Shake the bottle well and add the ink using the applicator direct to the stylus.
Start adding to your paper by blending in circle motions. I leave white spaces for the next color to 'grab'.
I added Sugarberry next. This is the darkest but since Pool (blue) is an accent, I used it last. I don't clean my applicator between colors.
This is what my sheet looked like after adding the second color (Sugarberry).
This is what my background looked like after adding the third colour (Pool). Smooch Inks have a beautiful sheen as it catches the light. The colors are not showing true in this photo, it's much more purple.
Next I stamped with one of the stars in Ryn's Celtic Star Set using Brilliance Platnium Planet Ink over the background.
I stamped the quote direct to the background with black Stazon Ink. After this was done, I wished I had embossed it so that it stands out more. I added the heart, ribbon and mats.
If you have any questions, please leave me a comment and I'll reply on the comment page. I find that if I leave my email address on my blog, I get too much 'wierd' Spam. I won't talk about what kind I've received.
If you get a chance, please stop by Miranda's and Eileen's Blog who are also on Ryn's Design Team. They have beautiful blogs with lots of inspiration.
Thanks for stopping by and have a great day !
Shirley
Saturday, October 27, 2012
The Miracle of Christmas
Happy Weekend Everyone ! It's cool & misty here this morning, a cozy day to stay inside :)
I received a few more of Design by Ryn's Celtic Stamps to work with ! Her Celtic designs are beautiful and I'm fascinated that she hand-drew the knots. I created this card using her Celtic Star 3 along with the Celtic Star Set. I decided to make them into Christmas Ornaments. It's a little difficult to get a good photo as the Smooch Inks have a sheen that isn't showing and the photo is a little dark. I tried to adjust the lighting and this is the best that I could do after several attempts at photographing this card.
I created the background blending Smooch Inks (Pool, Ocean & Kiwi, my favourite colour combo). I over stamped the background using one of the smaller stars in the Celtic Star Set with Colorbox Gold & then Harbour Inks. You can see the reflection of the gold from the light in the close-up below.
I stamped Celtic Star 3, one smaller star from the Celtic Star Set and the Quote (Impression Obsession - C3505) with Colorbox Harbour Ink and embossed with Clear. I blended Shabby Shutters and Broken China Distress Inks over and highlighted the knots with Distress Markers. I carefully cut them out, added some ribbon and layered as shown.
Spellbinder: S4-322 Grommet Tags.
If you get a chance, stop by Eileen's Blog and Miranda's Blog who also design for Ryn and always have beautiful creations posted. Also Ryn's Face Book Page has a great gallery of Inspiration !
Thanks for stopping by and enjoy your weekend !
Shirley
I received a few more of Design by Ryn's Celtic Stamps to work with ! Her Celtic designs are beautiful and I'm fascinated that she hand-drew the knots. I created this card using her Celtic Star 3 along with the Celtic Star Set. I decided to make them into Christmas Ornaments. It's a little difficult to get a good photo as the Smooch Inks have a sheen that isn't showing and the photo is a little dark. I tried to adjust the lighting and this is the best that I could do after several attempts at photographing this card.
I created the background blending Smooch Inks (Pool, Ocean & Kiwi, my favourite colour combo). I over stamped the background using one of the smaller stars in the Celtic Star Set with Colorbox Gold & then Harbour Inks. You can see the reflection of the gold from the light in the close-up below.
I stamped Celtic Star 3, one smaller star from the Celtic Star Set and the Quote (Impression Obsession - C3505) with Colorbox Harbour Ink and embossed with Clear. I blended Shabby Shutters and Broken China Distress Inks over and highlighted the knots with Distress Markers. I carefully cut them out, added some ribbon and layered as shown.
Spellbinder: S4-322 Grommet Tags.
If you get a chance, stop by Eileen's Blog and Miranda's Blog who also design for Ryn and always have beautiful creations posted. Also Ryn's Face Book Page has a great gallery of Inspiration !
Thanks for stopping by and enjoy your weekend !
Shirley
Wednesday, September 12, 2012
In the Pink with a Starflower
Good Morning! I hope you are having a great week. We are enjoying fabulous weather, sunshine and low 20's (Celsius), beautiful ! I feel energized when the humidity of the summer leaves and it was a hot, dry one this year.
I'm entering this card that I created a while ago into the In the Pink Challenge. Christine & Sylvia are asking for "Anything but Square" for Challenge #3 and since this card is rectangular, it qualifies. I also think I can use this for Christmas.
I used Impression Obsession's beautiful Starflowers set - 3066-LG by Leigh Hannon. The set includes two beautiful flowers.
The background was created by blending Taffy & Snickerdoodle Smooch Inks over white cardstock (cover with Versamark Ink first) and then I stamped one of the flowers with Brilliance Gold Ink at random. I embossed the flower with gold on white cardstock and blended Taffy Smooch Ink over it. Next I used the little applicator to highlight areas with Taffy Smooch Ink (pink). After carefully cutting it out, I mounted it with pop dots onto the background. A few layers of matting, ribbon and half pearls finished the card.
That's all for now ! Thanks for your visit, they are always appreciated.
Have a great day !
Shirley
I'm entering this card that I created a while ago into the In the Pink Challenge. Christine & Sylvia are asking for "Anything but Square" for Challenge #3 and since this card is rectangular, it qualifies. I also think I can use this for Christmas.
I used Impression Obsession's beautiful Starflowers set - 3066-LG by Leigh Hannon. The set includes two beautiful flowers.
The background was created by blending Taffy & Snickerdoodle Smooch Inks over white cardstock (cover with Versamark Ink first) and then I stamped one of the flowers with Brilliance Gold Ink at random. I embossed the flower with gold on white cardstock and blended Taffy Smooch Ink over it. Next I used the little applicator to highlight areas with Taffy Smooch Ink (pink). After carefully cutting it out, I mounted it with pop dots onto the background. A few layers of matting, ribbon and half pearls finished the card.
That's all for now ! Thanks for your visit, they are always appreciated.
Have a great day !
Shirley
Saturday, August 11, 2012
In the Pink with Celtic Stars
Happy Weekend !
A new Challenge Blog launched this week - In The Pink. If you love using the colour pink then this is the challenge site for you :) Sylvia (aka Pretty Patricia) and Christine (aka Posh Priscilla) created and are co-hosting this blog. Both are mega talented and have posted gorgeous creations for inspiration.
I can't honestly say that I'm a 'Pink Person', but I enjoy creating with lots of different colours and Pink makes an appearance from time to time. Certainly a big change from the green & blue that I gravitate to :)
This is a busy (but fun) time with my sister visiting, but I had this card ready for Designs by Ryn last week using the colour pink. I was hoping that the first pink challenge would be 'anything goes'. I guessed right as their first challenge is "Fifty Shades of .......... Pink" :) As long as you use lots of pink, anything goes :)
I created a Pink Christmas card using Designs by Ryn Celtic Star Set CM-C7 .
The background was created by blending Snickerdoodle & Taffy Smooch Inks. I stamped one star from the set with Picked Raspberry Distress Ink over the background using a 'smoosh' technique.
I've been using Smooch inks to create backgrounds for over two years and still using the same small bottles with the exception of one favourite colour (Pool). They are also great for colouring in small spaces using the applicator tip or just blend them around using your fingers. These inks leave a beautiful sheen that is hard to see in the photo. A good friend of mine uses Smooch for colouring all the time with her fingers and ends up with beautiful images & creations.
To create backgrounds with Smooch Inks:
A new Challenge Blog launched this week - In The Pink. If you love using the colour pink then this is the challenge site for you :) Sylvia (aka Pretty Patricia) and Christine (aka Posh Priscilla) created and are co-hosting this blog. Both are mega talented and have posted gorgeous creations for inspiration.
I can't honestly say that I'm a 'Pink Person', but I enjoy creating with lots of different colours and Pink makes an appearance from time to time. Certainly a big change from the green & blue that I gravitate to :)
This is a busy (but fun) time with my sister visiting, but I had this card ready for Designs by Ryn last week using the colour pink. I was hoping that the first pink challenge would be 'anything goes'. I guessed right as their first challenge is "Fifty Shades of .......... Pink" :) As long as you use lots of pink, anything goes :)
I created a Pink Christmas card using Designs by Ryn Celtic Star Set CM-C7 .
The background was created by blending Snickerdoodle & Taffy Smooch Inks. I stamped one star from the set with Picked Raspberry Distress Ink over the background using a 'smoosh' technique.
I've been using Smooch inks to create backgrounds for over two years and still using the same small bottles with the exception of one favourite colour (Pool). They are also great for colouring in small spaces using the applicator tip or just blend them around using your fingers. These inks leave a beautiful sheen that is hard to see in the photo. A good friend of mine uses Smooch for colouring all the time with her fingers and ends up with beautiful images & creations.
To create backgrounds with Smooch Inks:
- Cover white cardstock with Versamark Ink. I use cardstock that is suitable for Copic Markers as I like the quality & smooth finish.
- Use a Colorbox blending tool with black moldable tip
- Add Smooch Ink with lightest colour first
- Blend quickly, if you leave some white space the next colour is more vibrant
- Clean tool with baby wipes after you are finished, it's not necessary to clean between colours
Designs by Ryn stamp set used:
![]() |
| CM-C7 Celtic Star Set |
Thanks for your visit and enjoy your weekend !
Shirley
Saturday, June 16, 2012
Climbing Vine in Pink
Hello everyone. I've had a busy week, I can't seem to get on top of everything, but I'm thankful that I have so many things I love to do. Sorry I'm a little behind on visiting blogs, but I will get caught up !
Yesterday I hosted a group of crafty friends here for 6 hours of embroidery, talking, eating & laughing... such an enjoyable day. We enjoyed our lunch under trees out in the gardens, it doesn't get much better !
I'm posting a card today that I created for Designs by Ryn . The stamps used for this card are two of Ryn's Flora Designs: Climbing Vine CM-F17 & African Daisy CM-F1. The climbing vine is also a nice match with Ryn's Vine Heart CM-F16.
The background was created with Taffy & Snickerdoodle Smooch Inks. I love the sheen of Smooch Inks, which is hard to see in photos.
The Climbing vine, Daisy & Quote were embossed with gold. The Daisies were also coloured with Smooch Inks. I blended Snickerdoodle around the quote (IO's C3671) that was stamped on a die cut using Spellbinder S4143. All were layered as shown.
Design by Ryn Stamps used:
I was also given the honour yesterday by Ellen at The Serendipitous Stamper of another Blog Award which originates from Italy and is intended to bring luck. You will enjoy a visit at Ellen's Blog as she is a talented crafter and includes some awesome tutorials. Ellen is a very kind hearted person who keeps quite busy with her family, volunteer work and DT functions. I don't know how she does everything.
I feel honoured to receive so many blog awards from my kind followers, but I think that I've received more than my share. I find it too hard to select blogs to pass the award onto and leave others out. Your kind comments & visits make blogging reward enough and also gives me encouragement to keep on creating.
That's all for now. Thanks for your visit and enjoy the rest of your weekend !
Shirley
Yesterday I hosted a group of crafty friends here for 6 hours of embroidery, talking, eating & laughing... such an enjoyable day. We enjoyed our lunch under trees out in the gardens, it doesn't get much better !
I'm posting a card today that I created for Designs by Ryn . The stamps used for this card are two of Ryn's Flora Designs: Climbing Vine CM-F17 & African Daisy CM-F1. The climbing vine is also a nice match with Ryn's Vine Heart CM-F16.
The background was created with Taffy & Snickerdoodle Smooch Inks. I love the sheen of Smooch Inks, which is hard to see in photos.
The Climbing vine, Daisy & Quote were embossed with gold. The Daisies were also coloured with Smooch Inks. I blended Snickerdoodle around the quote (IO's C3671) that was stamped on a die cut using Spellbinder S4143. All were layered as shown.
Design by Ryn Stamps used:
![]() |
| CM-F1 African Daisy |
![]() |
| CM-F17 Climbing Vine |
I was also given the honour yesterday by Ellen at The Serendipitous Stamper of another Blog Award which originates from Italy and is intended to bring luck. You will enjoy a visit at Ellen's Blog as she is a talented crafter and includes some awesome tutorials. Ellen is a very kind hearted person who keeps quite busy with her family, volunteer work and DT functions. I don't know how she does everything.
I feel honoured to receive so many blog awards from my kind followers, but I think that I've received more than my share. I find it too hard to select blogs to pass the award onto and leave others out. Your kind comments & visits make blogging reward enough and also gives me encouragement to keep on creating.
That's all for now. Thanks for your visit and enjoy the rest of your weekend !
Shirley
Sunday, May 27, 2012
Waterlily & Bubbles
Hello Crafters ! I hope you enjoyed your weekend. We had fun with our family and of coarse gardening.
I'm posting a card that I created using stamps that are hand drawn designs by two different artists.
The Sea Bubbles Set, CM-S15 is from Designs by Ryn and the Waterlily is from the Crealies Company in the Netherlands, designed by Miranda of Miracle Art Inspirations . I think these two talented artists' designs look great together :)
I was lucky as my sweet 'baby' sister who lives in the Netherlands mailed a couple more of Miranda designed stamps over to me :) I also think I'm lucky to design for Design's by Ryn !
I created the background by blending Lettuce, Frosted Aqua & Pool Smooch Inks over Versamark ink on white smooth card stock. I then stamped Design by Ryn's - Sea Bubbles in several areas and embossed with gold.
I stamped the Crealies Waterlily on watercolour paper, embossed with gold and coloured with my Tombows using a brush & water. I gave the background of the waterlily a light wash of blue paint using the die as a stencil.
I used Spellbinders Nestabilities S4-114 to cut the circle. I drew an outline outside of the die on the aqua card stock to create the circle mat. I added sheer ribbon and layered onto co-ordinating card stock as shown. I also added some diamond stickles which is difficult to see in the photo.
My step mom is an avid photographer and takes beautiful photos of nature. Below is a photo that she took of a waterlily at the Naples Botanical Gardens this winter.
Thanks for your visit & have a great day !
Shirley
I'm posting a card that I created using stamps that are hand drawn designs by two different artists.
The Sea Bubbles Set, CM-S15 is from Designs by Ryn and the Waterlily is from the Crealies Company in the Netherlands, designed by Miranda of Miracle Art Inspirations . I think these two talented artists' designs look great together :)
I was lucky as my sweet 'baby' sister who lives in the Netherlands mailed a couple more of Miranda designed stamps over to me :) I also think I'm lucky to design for Design's by Ryn !
I created the background by blending Lettuce, Frosted Aqua & Pool Smooch Inks over Versamark ink on white smooth card stock. I then stamped Design by Ryn's - Sea Bubbles in several areas and embossed with gold.
I stamped the Crealies Waterlily on watercolour paper, embossed with gold and coloured with my Tombows using a brush & water. I gave the background of the waterlily a light wash of blue paint using the die as a stencil.
I used Spellbinders Nestabilities S4-114 to cut the circle. I drew an outline outside of the die on the aqua card stock to create the circle mat. I added sheer ribbon and layered onto co-ordinating card stock as shown. I also added some diamond stickles which is difficult to see in the photo.
My step mom is an avid photographer and takes beautiful photos of nature. Below is a photo that she took of a waterlily at the Naples Botanical Gardens this winter.
Thanks for your visit & have a great day !
Shirley
Friday, May 18, 2012
Patio Stone & Daisies
Hello Crafters !
I've been distracted by other activities, including the gardens but I'm back ! I may not be able to blog as much during the gardening season, but I'll do my best ! Thanks again for all your wonderful support here.
I designed this card for Design's by Ryn using one of her cool Texture Stamps - Patio Stone CM-T6 for the background and African Daisy CM-F1.
I created the background by blending Snickerdoodle, Lettuce & Kiwi Smooch inks over Versamark Ink. Next I stamped 'Design by Ryn's' Patio Stone with Kiwi Smooch (dried with heat gun) and then Bamboo Leaves & Cantaloupe Memento Dye Inks.
This is how the background looked before I added the quote & Flowers.
Thanks for your visit and enjoy your weekend !
I've been distracted by other activities, including the gardens but I'm back ! I may not be able to blog as much during the gardening season, but I'll do my best ! Thanks again for all your wonderful support here.
I designed this card for Design's by Ryn using one of her cool Texture Stamps - Patio Stone CM-T6 for the background and African Daisy CM-F1.
I created the background by blending Snickerdoodle, Lettuce & Kiwi Smooch inks over Versamark Ink. Next I stamped 'Design by Ryn's' Patio Stone with Kiwi Smooch (dried with heat gun) and then Bamboo Leaves & Cantaloupe Memento Dye Inks.
This is how the background looked before I added the quote & Flowers.

I stamped the 'create' quote from Chocolate Baroque's Artistic Expressions set with Cocoa Memento Dye Ink directly to the background. I stamped Ryn's African Daisy and embossed with Gold on white paper 3 times. I blended Smooch Inks to color & added some Lime Stickles to the centre, cut them out and attached to the background. Finally I added some leaves created with my newest Crealies Shapes CL CS 12 from the same card stock as the mat.
Design by Ryn Stamps used:
![]() |
| Design by Ryn - Patio Stone CM-T6 |
![]() |
| Design by Ryn - African Daisy CM-F1 |
It's Victoria Day long weekend here in Canada and the forecast for this area is sunny & low 20's ! Looks like lots of gardening & window cleaning on our agenda ! :)
Shirley
Thursday, May 03, 2012
Blog Candy and a Butterfly Fish !
Hello Crafters !
Ryn of Designs by Ryn is happy to announce that her website has been enhanced and we have Blog Candy to celebrate ! I hope that you would like to join us for a chance to win.
All stamps by Ryn are made with high quality rubber that are deeply etched and provide a sharp image every time ! I love working with her beautiful hand-drawn designs. The deep etching allows the stamps to be applied to other surfaces besides paper. They work well with other mediums such as clay & fabric. Visit Designs by Ryn's Website for more information which includes a gallery at each product/design, an enhanced shopping cart & has been updated with her full line.
To be eligible for a chance to win please:
One winner will be chosen by Random.Org and will be announced here on May 17th, 2012. Good Luck !
Below are three cards that I created using two of Design by Ryn stamps. CM-S8 Butterfly Fish & CM-S9 Kelp which are from her new Sea Creatures Line.
The background for this card was created by blending Smooch Inks. (To create Smooch Backgrounds, start by adding Versa Mark Ink over smooth white card stock. Next add Smooch Ink with a Colorbox applicator & black moldable tip - the applicator cleans up easily with baby wipes). I used Banana Custard, Pool & Ocean Smooch Inks.
Next I stamped Kelp with Colorbox Harbor Pigment Ink. I used a small acrylic block and added Gold Lame' Smooch in clumps over the blended inks. It looks like coral in spots. I also stamped Kelp with Gold Lame Smooch which resulted in a neat gold texture which you can see this at the top of the background.
I stamped Buttefly fish and embossed with Gold on Watercolour Paper. I used just one Peach colour Tom Bow marker and blended it lighter in areas, then cut him out and popped him up. I didn't want colour to compete with the background or the detail on the beauty fishie !
The next card was also created with same stamps but with a different technique & colours. I've made so many 'fishie' cards using sea colours it was time for a change !
The background was created with Shabby Shutters and Scattered Straw Distress Inks using the Acrylic Block Technique and then sprayed with Sunshine Glimmermist. Kelp was stamped with Foxglove Memories Pigment Ink.
Butterfly Fish was stamped and embossed with Gold on Watercolour paper and Coloured with Tom Bow Markers.
The spellbinder label from S5-034 set was coloured by blending Scattered Straw and Dusty Concord Distress Inks. The sentiment is from the Impression Obsession set MC183 Angelfish & also embossed in Gold. I also added some Holograph border stickers from Starform & some gold ribbon.
This last card below was created using Smooch Inks (Pool, Ocean & Kiwi) for the background, Kelp was stamped with Colorbox Platinum and again a little gold smooch was added using an acrylic block. The fish was stamped with Harbour Ink and embossed with clear before blending Kiwi Smooch Ink over top. I also added holograph glitter in areas. The ribbon is actually blue & green it's hard to see in the photo.
Thank you for your visits, they are always appreciated & Good Luck in the draw !
Shirley
Ryn of Designs by Ryn is happy to announce that her website has been enhanced and we have Blog Candy to celebrate ! I hope that you would like to join us for a chance to win.
All stamps by Ryn are made with high quality rubber that are deeply etched and provide a sharp image every time ! I love working with her beautiful hand-drawn designs. The deep etching allows the stamps to be applied to other surfaces besides paper. They work well with other mediums such as clay & fabric. Visit Designs by Ryn's Website for more information which includes a gallery at each product/design, an enhanced shopping cart & has been updated with her full line.
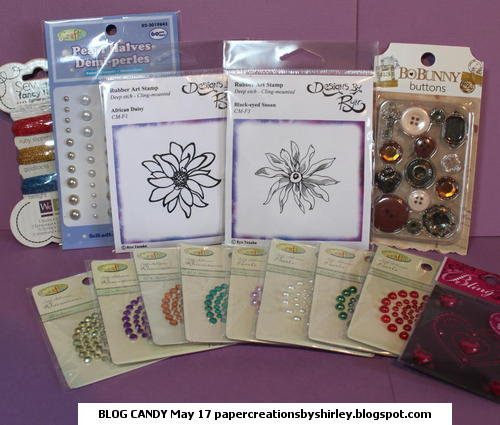
BLOG CANDY !
The Blog Candy package includes two Designs by Ryn stamps along with other 'goodies'
To be eligible for a chance to win please:
1. Leave a comment at the end of this post before May 17th, 2012 :)
2. Join as a follower if you are not already :)
3. Add the above 'Candy Photo' to your Blog sidebar with a link back here. (if you have a Blog).
One winner will be chosen by Random.Org and will be announced here on May 17th, 2012. Good Luck !
Below are three cards that I created using two of Design by Ryn stamps. CM-S8 Butterfly Fish & CM-S9 Kelp which are from her new Sea Creatures Line.
The background for this card was created by blending Smooch Inks. (To create Smooch Backgrounds, start by adding Versa Mark Ink over smooth white card stock. Next add Smooch Ink with a Colorbox applicator & black moldable tip - the applicator cleans up easily with baby wipes). I used Banana Custard, Pool & Ocean Smooch Inks.
Next I stamped Kelp with Colorbox Harbor Pigment Ink. I used a small acrylic block and added Gold Lame' Smooch in clumps over the blended inks. It looks like coral in spots. I also stamped Kelp with Gold Lame Smooch which resulted in a neat gold texture which you can see this at the top of the background.
I stamped Buttefly fish and embossed with Gold on Watercolour Paper. I used just one Peach colour Tom Bow marker and blended it lighter in areas, then cut him out and popped him up. I didn't want colour to compete with the background or the detail on the beauty fishie !
The next card was also created with same stamps but with a different technique & colours. I've made so many 'fishie' cards using sea colours it was time for a change !
The background was created with Shabby Shutters and Scattered Straw Distress Inks using the Acrylic Block Technique and then sprayed with Sunshine Glimmermist. Kelp was stamped with Foxglove Memories Pigment Ink.
Butterfly Fish was stamped and embossed with Gold on Watercolour paper and Coloured with Tom Bow Markers.
The spellbinder label from S5-034 set was coloured by blending Scattered Straw and Dusty Concord Distress Inks. The sentiment is from the Impression Obsession set MC183 Angelfish & also embossed in Gold. I also added some Holograph border stickers from Starform & some gold ribbon.
This last card below was created using Smooch Inks (Pool, Ocean & Kiwi) for the background, Kelp was stamped with Colorbox Platinum and again a little gold smooch was added using an acrylic block. The fish was stamped with Harbour Ink and embossed with clear before blending Kiwi Smooch Ink over top. I also added holograph glitter in areas. The ribbon is actually blue & green it's hard to see in the photo.
Thank you for your visits, they are always appreciated & Good Luck in the draw !
Shirley
Monday, April 30, 2012
Anniversary Peacock Fan & Awards
Good Morning Crafters! I've had an exciting few Blogging days !
On Friday I was thrilled to learn that I earned the Lovely Lotus Award from For Your Inspiration for their Photo Challenge #27. Thank you ladies !
Yesterday evening I was honored a second time with the Liebster Blog Award from Maria at Crafty Maria's Stamping World . Maria is a Stampin' Up Demonstrator who also teaches classes and has a terrific Blog full of ideas, tutorials & beautiful cards. Needless to say, I was excited to receive this award again so recently after receiving it the first time (when I forwarded it on to 5 others) Thank you Maria !
And finally, I'm happy that I have many new Followers and would like to thank all of you for your visits & comments. Without all of you, blogging would not be so rewarding. I also enjoy visiting at your Blogs where I gather a lot of inspiration !
Now onto a new creation ! A friend asked me to create a card that she will give to her daughter & son-in-law for their First Wedding Anniversary. Their Wedding theme was Peacock Feathers, and she asked that the design include Peacock feathers and the colours Emerald Green, Red & Purple.
I used stamps from Chocolate Baroque to create this card. The two stamp sets: Peacock Fan & Artistic Expressions.
The purple strip on the LH side was created by blending Grape Soda, Sugar Berry & Gold Lame Smooch Inks and then I stamped one of the feathers from the Peacock Fan set with ColorBox Gold Pigment Ink over top. I added a narrow red mat under this piece.
I stamped the same feather with Versa Mark on the folded green cardstock and just left it with a watermark image. The color & stamping on the green shows up a little better in the closeup photo below.
The LOVE sentiment from the Artistic Expressions set was stamped & embossed with Gold and then cut with Spellbinders S4-322 Grommet tag. I blended Evergreen Bough Distress Ink over top.
The Peacock Feather Fan was stamped and embossed with Gold on Watercolour paper and then painted with my Tombows.
Thanks for your visits and have a great day !
Shirley
On Friday I was thrilled to learn that I earned the Lovely Lotus Award from For Your Inspiration for their Photo Challenge #27. Thank you ladies !
Yesterday evening I was honored a second time with the Liebster Blog Award from Maria at Crafty Maria's Stamping World . Maria is a Stampin' Up Demonstrator who also teaches classes and has a terrific Blog full of ideas, tutorials & beautiful cards. Needless to say, I was excited to receive this award again so recently after receiving it the first time (when I forwarded it on to 5 others) Thank you Maria !
And finally, I'm happy that I have many new Followers and would like to thank all of you for your visits & comments. Without all of you, blogging would not be so rewarding. I also enjoy visiting at your Blogs where I gather a lot of inspiration !
Now onto a new creation ! A friend asked me to create a card that she will give to her daughter & son-in-law for their First Wedding Anniversary. Their Wedding theme was Peacock Feathers, and she asked that the design include Peacock feathers and the colours Emerald Green, Red & Purple.
I used stamps from Chocolate Baroque to create this card. The two stamp sets: Peacock Fan & Artistic Expressions.
The purple strip on the LH side was created by blending Grape Soda, Sugar Berry & Gold Lame Smooch Inks and then I stamped one of the feathers from the Peacock Fan set with ColorBox Gold Pigment Ink over top. I added a narrow red mat under this piece.
I stamped the same feather with Versa Mark on the folded green cardstock and just left it with a watermark image. The color & stamping on the green shows up a little better in the closeup photo below.
The LOVE sentiment from the Artistic Expressions set was stamped & embossed with Gold and then cut with Spellbinders S4-322 Grommet tag. I blended Evergreen Bough Distress Ink over top.
The Peacock Feather Fan was stamped and embossed with Gold on Watercolour paper and then painted with my Tombows.
Thanks for your visits and have a great day !
Shirley
Subscribe to:
Posts (Atom)