Hello everyone, Happy Easter Weekend!
I have a couple of cards today featuring stamps from Designs by Ryn.
This first card features Ryn's African Daisy, Seaweed set & Sea Bubbles. I must have 'Spring Fever' with these sunny colours. We are still waiting for our snow to melt, but it is getting milder, I can't wait to get into the gardens again.
The background is a piece of watercolour paper that I used as a 'mop up' sheet of green & blue from other projects.
I used both stamps from the Seaweed set
- the outline and solid design to create the 'foilage' with Pine
Needles Distress Ink. I used a white Gellyroll pen to colour inside the
outline branches. I stamped the small Sea Bubble along the edge with black Versafine Ink and again highlighted with the white Gellyroll pen. I embossed the Daisies with black and coloured with my Tombow markers.
The sentiment is from Chocolate Baroque's Words of Gratitude set.
And below is a second design using the same African Daisy stamp. The
actual card is much more vibrant, the photograph is dark unfortunately
and I tried many ways to get it to come out properly.
I started with Dylusions Inks in the background (red & purple). I used Dylusions Luscious Leaves stencil with Viva Decor Bronze Modelling Creme.
I love the texture & shine you get using this creme. It dries
quickly, you need to clean your stencil immediately with water after
using.
I used Seedless Preserves Distress Ink to stamp the Leafy Branch and blended more around the edges of the background. The African Daisies
were embossed with gold, I used Mica Colour paints to colour &
added Copper stickles to the centres. All stamps are available one
line at Designs by Ryn's webstore.
The African Daisy is also available at Crop Circles.
Thanks for stopping by and enjoy the weekend!
Shirley
Thursday, March 28, 2013
Tuesday, March 26, 2013
Floral Damask & colouring
Hello everyone, I hope you are having a great week.
I've been inspired by the colouring of backgrounds by my talented team mates at the Chocolate Baroque Design Team using the new Big Bold Background stamps. I also wanted to try Miranda's technique of stamping with white ink and then colouring over top with Pencils.
I stamped the Floral Damask Background with Brilliance Moonlight White onto a sheet of Basic Grey paper that has a slight variance in the colour. I decided to colour/highlight the centre portion of the Floral Damask design with my Prisma Pencils and left the rest to 'fade' out.
Once I started to colour the detailed design of this beautiful image I fell in love with it a little more!
Thanks for stopping by and have a great day,
Shirley
I've been inspired by the colouring of backgrounds by my talented team mates at the Chocolate Baroque Design Team using the new Big Bold Background stamps. I also wanted to try Miranda's technique of stamping with white ink and then colouring over top with Pencils.
I stamped the Floral Damask Background with Brilliance Moonlight White onto a sheet of Basic Grey paper that has a slight variance in the colour. I decided to colour/highlight the centre portion of the Floral Damask design with my Prisma Pencils and left the rest to 'fade' out.
Once I started to colour the detailed design of this beautiful image I fell in love with it a little more!
Thanks for stopping by and have a great day,
Shirley
Sunday, March 24, 2013
Leafy Trails with a Rose
Hello everyone, I hope you are having a great weekend. I would like to welcome a couple of new followers! Thank you to all of my followers & visitors for making blogging so enjoyable!
I have a card today using one of Chocolate Baroque's new Big Bold Backgrounds - Leafy Trails. I've combined it with the single Rose from the Rose & Thistle set.
I stamped & embossed all the images with Gold and painted with my mica water colour paints. Before I painted, I blended Tattered Rose Distress Ink around the background. The ribbon is hand painted silk which is a richer colour than the photo shows.
Thanks for stopping by & have a great day !
Shirley
I have a card today using one of Chocolate Baroque's new Big Bold Backgrounds - Leafy Trails. I've combined it with the single Rose from the Rose & Thistle set.
I stamped & embossed all the images with Gold and painted with my mica water colour paints. Before I painted, I blended Tattered Rose Distress Ink around the background. The ribbon is hand painted silk which is a richer colour than the photo shows.
Thanks for stopping by & have a great day !
Shirley
Friday, March 22, 2013
Butterfly Daisy Collage
Happy Spring everyone ! The calendar says "Spring" but I see tons of snow! However the days are getting longer, the sun is higher in the sky, so it is coming.
This card was definitely created while thinking about warmer temperatures, flowers blooming and butterflies hanging out in our gardens. I think it will work as a Mother's Day card. The background is more yellow that this photo shows.
I used a sheet of designer paper that's been hanging out in my stash for the background. (6x6 Basic Grey). I used the Butterfly Daisy Collage set from Chocolate Baroque to create this design which is on special for TWO weeks starting today. 'With Love' is from the Loving Sentiments set.
I ordered the pretty Spellbinder -Labels Eight, Decorative Elements dies after seeing beautiful designs using it at Donna's Blog. It certainly makes the 'standard' Label Eight die decorative. I coloured the images with Prisma Pencils and decoupaged the butterfly & a few daisies.
Here is a look at the stamp set, there are so many possibilities with these beautiful designs. It's 'sister set' Butterfly Poppy Collage is also on special.
Thanks for your visit and have a great day!
Shirley
This card was definitely created while thinking about warmer temperatures, flowers blooming and butterflies hanging out in our gardens. I think it will work as a Mother's Day card. The background is more yellow that this photo shows.
I used a sheet of designer paper that's been hanging out in my stash for the background. (6x6 Basic Grey). I used the Butterfly Daisy Collage set from Chocolate Baroque to create this design which is on special for TWO weeks starting today. 'With Love' is from the Loving Sentiments set.
I ordered the pretty Spellbinder -Labels Eight, Decorative Elements dies after seeing beautiful designs using it at Donna's Blog. It certainly makes the 'standard' Label Eight die decorative. I coloured the images with Prisma Pencils and decoupaged the butterfly & a few daisies.
Here is a look at the stamp set, there are so many possibilities with these beautiful designs. It's 'sister set' Butterfly Poppy Collage is also on special.
Thanks for your visit and have a great day!
Shirley
Tuesday, March 19, 2013
Leafy Sea Dragon
Hello everyone, I hope you are doing well.
Our snow was melting but we still have piles in areas where it drifted during the storms in February. The shrubs that I like to prune in late winter are still buried and last night we 'enjoyed' another snow storm, more snow. It's freezing rain this morning and the roads are a mess. "Spring where are you? - the calendar says you should be here soon!"
Well let's forget about snow..... have you ever seen a Leafy Sea Dragon? I hadn't until I saw him amongst Design by Ryn's Sea Creatures collection and thought he was the coolest design. I had fun creating another 'sea' for him to hang out in.
Starting with a piece of water colour paper, I added watercolour paints wet on wet (just a inexpensive set - blue, green, purple, yellow and a little black). While it was still wet I added sea salt in areas where I wanted create a 'bubble effect'. Once dry and the salt brushed off, I sprayed yellow & gold Glimmermist. Still not satisfied I sprayed a little turquoise Dylusions here & there and blotted off.
Once dry again I blended Peacock Feathers Distress Ink around the parameter and stamped Ryn's Sea Bubbles with the same ink. I stamped one of Ryn's Seaweed Set stamps & blended Black Soot Distress Ink around the edge. I stamped Leafy Sea Dragon with black Stazon, then coloured him with Tombow markers. I used a Gellyroll pen for highlighting along with some glitter.
Hello... is by Impression Obsession - A3579.
Ryn recently added another new member to the Design Team! We are pleased to welcome Karin at Creativity to our growing group! If you get a chance to visit Ryn's Design Teams Blogs, they are listed on my right sidebar.
Thanks for your visit and have a great day!
Shirley
Our snow was melting but we still have piles in areas where it drifted during the storms in February. The shrubs that I like to prune in late winter are still buried and last night we 'enjoyed' another snow storm, more snow. It's freezing rain this morning and the roads are a mess. "Spring where are you? - the calendar says you should be here soon!"
Well let's forget about snow..... have you ever seen a Leafy Sea Dragon? I hadn't until I saw him amongst Design by Ryn's Sea Creatures collection and thought he was the coolest design. I had fun creating another 'sea' for him to hang out in.
Starting with a piece of water colour paper, I added watercolour paints wet on wet (just a inexpensive set - blue, green, purple, yellow and a little black). While it was still wet I added sea salt in areas where I wanted create a 'bubble effect'. Once dry and the salt brushed off, I sprayed yellow & gold Glimmermist. Still not satisfied I sprayed a little turquoise Dylusions here & there and blotted off.
Once dry again I blended Peacock Feathers Distress Ink around the parameter and stamped Ryn's Sea Bubbles with the same ink. I stamped one of Ryn's Seaweed Set stamps & blended Black Soot Distress Ink around the edge. I stamped Leafy Sea Dragon with black Stazon, then coloured him with Tombow markers. I used a Gellyroll pen for highlighting along with some glitter.
Hello... is by Impression Obsession - A3579.
Ryn recently added another new member to the Design Team! We are pleased to welcome Karin at Creativity to our growing group! If you get a chance to visit Ryn's Design Teams Blogs, they are listed on my right sidebar.
Thanks for your visit and have a great day!
Shirley
Sunday, March 17, 2013
Floral Damask with a Bold Bloom
Hello everyone, I hope you are doing well.
I have a couple cards with Chocolate Baroque designs. I've used one of the new Big Bold (& Beautiful) Backgrounds, Floral Damask on both. I've combined the first one with a flower from the Bold Blooms set.
I used peacock coloured designer paper for the background, stamped the Floral Damask background with Versamark, embossed with clear and blended Gathered Twigs Distress Ink over top. It's a different effect as the image is not 'sharp'.
I embossed the Flower & Leaves from Bold Blooms & Fresh Blooms with a metallic mix EP (gold, silver & bronze) twice, coloured with Distress Inks and added some glitter to the decoupaged center.
I decided to not add too much to the background of this second card below.
I used a gold embossing power that has a bit of glitter chunks in it. As you can see, the image is sharper this time. I blended Distress Inks (Peacock & Raspberry) over and then added the sentiment from Birthday Words with Spellbinder label behind (S4-235).
If you get a chance to visit Chocolate Baroque's DT Blog my talented teammates are posting beautiful creations using the new stamps.
Thanks for stopping by & have a great day,
Shirley
I have a couple cards with Chocolate Baroque designs. I've used one of the new Big Bold (& Beautiful) Backgrounds, Floral Damask on both. I've combined the first one with a flower from the Bold Blooms set.
I used peacock coloured designer paper for the background, stamped the Floral Damask background with Versamark, embossed with clear and blended Gathered Twigs Distress Ink over top. It's a different effect as the image is not 'sharp'.
I embossed the Flower & Leaves from Bold Blooms & Fresh Blooms with a metallic mix EP (gold, silver & bronze) twice, coloured with Distress Inks and added some glitter to the decoupaged center.
I decided to not add too much to the background of this second card below.
I used a gold embossing power that has a bit of glitter chunks in it. As you can see, the image is sharper this time. I blended Distress Inks (Peacock & Raspberry) over and then added the sentiment from Birthday Words with Spellbinder label behind (S4-235).
If you get a chance to visit Chocolate Baroque's DT Blog my talented teammates are posting beautiful creations using the new stamps.
Thanks for stopping by & have a great day,
Shirley
Wednesday, March 13, 2013
Seahorse Friends
Hello everyone, I hope you are having a great week.
I have a card today created for Designs by Ryn. I used Ryn's cool Seahorse Set in a clean & simple design.
I masked off an area with scrap cardstock and blended Peacock Feathers & Mowed Lawn Distress Inks. Using the mini Circle Explosion Stencil from TCW I added the dots with Picked Raspberry & Peacock Feathers DI.
The Seahorse (all three are in the set) were stamped on watercolour paper with black Stazon Ink & coloured with my Tombow markers. I added a little glitter as well. The sentiment is by Impression Obsession B13027.
If you get a chance please stop by my teammate's - Miranda's, Eileen's & our new member Wendy's Blogs and Ryn's Facebook page for inspiration :)
Thanks for stopping by and have a great day,
Shirley
I have a card today created for Designs by Ryn. I used Ryn's cool Seahorse Set in a clean & simple design.
I masked off an area with scrap cardstock and blended Peacock Feathers & Mowed Lawn Distress Inks. Using the mini Circle Explosion Stencil from TCW I added the dots with Picked Raspberry & Peacock Feathers DI.
The Seahorse (all three are in the set) were stamped on watercolour paper with black Stazon Ink & coloured with my Tombow markers. I added a little glitter as well. The sentiment is by Impression Obsession B13027.
If you get a chance please stop by my teammate's - Miranda's, Eileen's & our new member Wendy's Blogs and Ryn's Facebook page for inspiration :)
Thanks for stopping by and have a great day,
Shirley
Monday, March 11, 2013
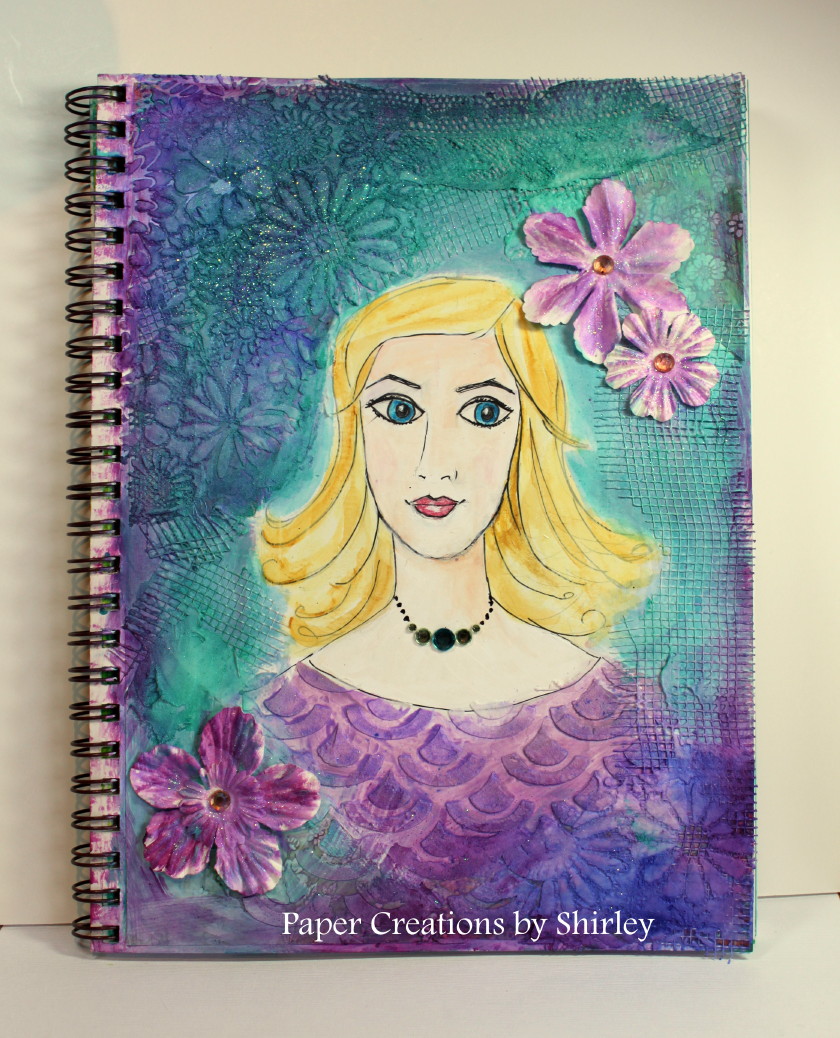
Party Lady
Hello Everyone, I hope you are doing well.
I worked on another Art Journal Page recently that I thought I would share. It ended up with a lot of molding paste for texture and probably should have been on a canvas board. I didn't have a plan before starting and because of all the texture I didn't stamp any words.
I used Gesso, Acrylic paints, Acrylic Glaze, Joint Tape, Molding Paste & stencils, Rhinestones for her necklace and some glitter here & there. I started with some Designer Paper adhered with Mod Podge but you can't see it in the photo. Oh yes there is a little lace as well ! Her face & hair were coloured/painted with Neocolor Crayons (water based). When I bought these I went with the 30 set, now wish I had more colours.
Thanks for your visit and have a great day !
Shirley
I worked on another Art Journal Page recently that I thought I would share. It ended up with a lot of molding paste for texture and probably should have been on a canvas board. I didn't have a plan before starting and because of all the texture I didn't stamp any words.
Thanks for your visit and have a great day !
Shirley
Subscribe to:
Posts (Atom)