Sunday, June 30, 2013

Fancy Flowers by Chocolate Baroque

Hello everyone and Happy Canada Day weekend to my fellow Canadians and Happy 4th of July to my American friends !

Chocolate Baroque has just announced July's new gorgeous stamp designs are Fancy Flowers and Poppy Meadow.    Each month it's like Christmas anticipating what yummy designs will be revealed. Today I have a design from the beautiful Fancy Flowers set.


I used a peach tone sheet of fairly solid designer paper for the backgrounds and stamped the images from Fancy Flowers with Cocoa Memento Dye Ink.   I coloured the beautiful flower with Prisma pencils and highlighted the center with a white Gelly Roll pen.   I blended a little Vintage Photo & Tumbled Glass DI around the background and added little pearls to the swirls of the flowers.

Here is a look at the Fancy Flowers A5 set with lots of beautiful images to colour and design with.   It's on special offer during July along with Poppy Meadow.   The two sets also qualify for a multi-buy discount.


If you would like to see designs by my talented teammates please visit Chocolate Baroque's Design Team Blog.     Also, you have a chance to win a set of the new gorgeous stamps -  all you need to do is leave a comment at this post here and Glenda will pick two winners at the end of next week.

Thanks for stopping by and have a great day,
Shirley

Thursday, June 27, 2013

Live in the Moment

Hello everyone, I hope you are having a great week.

I had some fun playing with the newer (wonderful) Dylusions ink colours and Design by Ryn stamps.  Of course I 'need' all the colours since I love using them so much.     The one I'm still missing is White Linen.   It's a semi opaque ink & works different that the others, it's fantastic.  So I decided I would try adding white Acrylic paint (not a heavy type) into a mini mister with water.  I shook it up and sprayed, the result is also a neat effect.


I started the background by spraying Calypso Teal, After Midnight Dylusions inks and some of the white Acrylic paint & water mix.   I stencilled over top with Seedless Preserves Distress Ink (bottom RH corner) and Peacock Feathers (top LH corner) and TCW mini Circle Explosion.

Next I stamped with white Colourbox Pigment Ink & Design by Ryn's fabulous Sea Bubbles.  And to finish the background I stamped part of her famous Water Droplets with black Stazon ink and highlighted with a white Gellyroll pen.

The fabulous quote is from Impression Obsession - D1379 Butterfly Counts, which makes me think about living in the moment.     

I stamped beautiful Selini the Moth on watercolour paper with Black Stazon and painted with Peacock Feathers & Picked Raspberry Distress Inks on my craft mat & a brush.   I also highlighted her with the white pen and cut her out to attach.


Thanks for stopping by,
Shirley 

Tuesday, June 25, 2013

More Peacock Designs !

Hello everyone, I hope all is well!

I have two more Peacock designs to show you today using the new fabulous stamps from Chocolate Baroque.


The background for the above card was created with Smooch Inks.   I stamped the feather over the background with Moss Green Pigment ink by Colorbox.   The Peacock Feather 'plant' from Peacock Parade and the bubbles at the top from the clear set -Decorative Edges were embossed with gold.    I added the gold border with a gold pen.   The Peacock above from Tangled Peacock was also embossed with Gold on watercolour paper and coloured with Tombow markers.  


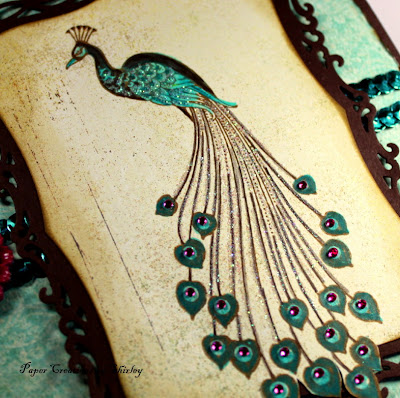
The backgrounds on the card above are designer papers from my stash.  I distressed the edges of the blue paper and added a little Tea Dye Distress Ink to both.    The Peacock & decorative edge are both from Peacock Parade which I stamped with Coffee Archival Ink.

I coloured over the Peacock with Prisma Pencils and added glitter and little rhinestones on his tail. 

Spellbinder Dies:  Labels Eight & Decorative Labels Eight.     I used the 'out of box' technique for the end of the tail.     Here is a link to a U Tube Video Tutorial.

A different angle:


Well that's all the Peacock designs I have for this month, they are gorgeous stamps and I look forward to 'playing' with them again.

Thanks for stopping by and have a great day,
Shirley

Saturday, June 22, 2013

The Key to Change

Hello everyone I hope you are having a great weekend.

I taught a workshop today with a great group of creative ladies.  We used many techniques to create five different cards and everyone's turned out beautiful.   Thank you ladies I had so much fun.

I don't have photos from the class but thought I would share a couple of tags that I made recently (not from the workshop).  

  
The background on the tag above was left over from another project with Dylusions Inks that I decided to cut it into a tag shape.   I added white acrylic paint with Dylusion's Dotted Flower stencil.   I stamped with a couple of the leaves from Design by Ryn's Three Leaves Set with Seedless Preserves Distress Ink.  The great quote is from Impression Obsession - Key to Change C13072.


I started with Acrylic paint on the above tag that was left over from another project.   I didn't want to waste it so I sponged 'blobs' here & there.    Next I sprayed lime Dylusions Inks.    I could 'see' flowers & a bird in the blue/green areas which I outlined with a black pigment pen and highlighted with a white pen.  I added design around the edge with Dylusion's Dotted Flower stencil using blue & brown acrylic paints.

Thanks for stopping by and have a great day,
Shirley

Thursday, June 20, 2013

Published in Craftstamper!

Hello everyone, I hope you are having a great week.

I was excited to learn that this card design was published in the July issue of the Craftstamper magazine (which is full of inspiration, techniques and printed in the UK).

I was inspired to use techniques described in an article by Liesbeth Fidder:  "Awash with Colour" on page 10 of the June 2012 issue of Craftstamper .   I used Neocolour II crayons vs Aquacolour crayons.   All stamped images are by Chocolate Baroque


I started by adhering designer paper to water colour paper with modge podge.   After drying, I painted Gesso over top.   Next I used Neocolour II (water soluble) crayons to add colour and sprayed with water to let it run.  

When dry I stamped the fragment around the edge from Textured Fragments using Black Soot Distress Ink.    The words are from Artistic Affirmations and the beautiful flowers are from Fantasy Meadow which I stamped with Black Stazon ink.   The flowers were painted with Tombow markers and I finished by adding stickles. 

Well that's my excitement for today, thanks for stopping by.
Cheers
Shirley

Tuesday, June 18, 2013

Zentangle Peacocks

Hello everyone !

I have a couple more Peacock Designs using stamps by Chocolate Baroque.   I've used the large Peacock from the Tangled Peacock set for these. 


The image on the above CAS design was stamped with black Stazon ink.   I spent some time colouring the fabulous image with my Prisma Pencils.     I added some outlining with a black Pigment pen and a little highlighting using a white Gelly Roll Pen.     The pink mat was created with Purple Dylusions.

This second card is a different colour combination and meant to be fun. 


The background was created with purple Dylusions ink and the Peacock, which I embossed with black, was coloured with Tombow markers.  I added a little Doodling around the border.   The sentiment is from Birthday Words.

 Update:  Yes I created the little 'flower' with feather 'eyes' from the main image that I stamped out again.


Thanks for stopping by and have a great day,
Shirley

Friday, June 14, 2013

Trickling Water with Tsuki the Moth

Hello everyone, I hope your week is going well.   We are enjoying some nice sunshine and moderate temperatures, wonderful!  

I have another card today using one of Design by Ryn's new water effect stamps.   This one features her Trickling Water, another design that appears 3D - amazing ! 

If you are interested in buying Ryn's unique and high quality stamps please visit her Rubber Stamp Shop - she sells directly to customers around the world.     You will also find lots of inspiration at her Facebook Page or at the rest of the Design Team blogs that are posted on my side bar.


Again I've used Dylusions Inks on the background (Purple, Lime & Turquoise).   Next I blended Shaded Lilac & Peacock Feathers Distress Ink over TCW Mini Ringlet Stencil.    I stamped with Ryn's Sea Bubble Set using the same two distress inks.

I stamped Trickling Water with Cobalt Archival Ink, blended the ink a little with water & brush and highlighted with a white Gelly Roll pen.  Bliss is from Chocolate Baroque's Artistic Affirmations Set.

Tsuki the Moth was embossed with Wow Black Glint powder and coloured with my Tombow markers.   I cut him out to attach over the background.

Thanks for stopping by and have a great weekend,
Cheers!
Shirley

Wednesday, June 12, 2013

Pink & Blue Peacock

Hello everyone !

I have another Peacock design today from Chocolate Baroque's new gorgeous Peacock Parade set. 


I started the background by using Distress Inks with the Acrylic Block technique and then added Dylusions Inks.   I over stamped with a fragment from Textured Fragments and the fan from Peacock Fan.   The Peacock and Fan were embossed with silver, coloured with my Tombow markers and decoupaged over the background.  I added a little silver embossing around the edges using embossing ink & powder.


Thanks for stopping by and have a great day,
Shirley

Sunday, June 09, 2013

A Bold Bloom for Christmas

Hello everyone !   I hope you had a great weekend.     We enjoyed a lovely sunny day today.

Two of my favourite stamp sets from Chocolate Baroque  -  Bold & Fresh Blooms are on special this week.  I decided to to create a Christmas card using these designs as it's never too soon to get started on them right?


I stamped & embossed the flower (five times) & the leaves with gold on Basic Grey Paper that was hanging out in my stash, I think it's from the Wassail collection.  

I'm not sure if it's called paper piecing or decoupage but I cut the flowers & layered as shown.  I added a metal flower & pearl at the top.    I stamped the mistletoe fragment from Pears & Baubles with Black Soot Distress Ink on the background.  I painted some of the design on the leaves with Vintage Mica Paints.    Noel is a clear stamp and this is the first time I've used it ! 

I decided to add gold around the edge of the background with a gold leaf pen after the card was assembled.   NOT a good idea, it ended up wobbly, certainly not as straight as I would like.   

Here is a look at the two stamp sets that are currently on special.   They are sold individually or with a multi-buy discount if you purchase them together.   I especially love the leaves.   


I'll be back soon with another Peacock Design!
Thanks for stopping by,
Shirley 

Saturday, June 08, 2013

Doodled Glam Lady

Happy Weekend everyone,  I hope you are doing well.   It's been dreary here with a lots of rain, but our plants (& weeds) love it.    I have another Art Journal page to share today.

I've been busy but found time to doodle another 'Glam Lady and yes this page is bright!    Maybe I should have titled this post "Hair Gone Wild" :)     I didn't start out with a plan, just 'going with the flow' and had fun with it.  

Again I've been inspired by Tracy Bautista's book, titled Doodles Unleashed where she shows many 'Glam Ladies'.     I'm also inspired by Marja's Doodle art (Marja's Stamping Addiction.)      My first Glam Lady is at this post here.


I drew the outlines with black pigment pens and then sprayed Dylusions inks for colour.     I painted the face with a couple of coats of 'economy' Gesso (now I know why it's inexpensive, it doesn't cover very well - live & learn), and added a little shadow.    I removed the Dylusions in some areas with bleach and repainted with Distress Inks (on my craft mat with water & brush).   I added the background circles with Acrylic Paint & TCW Mini Circle Explosion Stencil.

Thanks for stopping by and have a great day,
Shirley

Wednesday, June 05, 2013

My Heart is at Home

Hello everyone, I hope you are doing well.  We are enjoying cooler weather, with some nice sunshine, wonderful!   I'm behind visiting blogs, I hope to catch up soon.

I like the theme for the June challenge at Art Journal Journey which is "Home", and created this page in my journal to join in.    I love to be at home either inside doing something creative or outside surrounded by our gardens and trees.    This is a 'doodle drawing' with no stamps and is meant to be whimsical.


I started by drawing the outlines with a black pigment pen.   I added colour by spraying Dylusions Inks.  I used a little dish to draw the circle for the sun and covered it when spraying.  I removed the dish, sprayed the circle yellow and somehow the colour stayed inside.   I used stencils with Distress Inks for the trees, 'grass', roof, bricks and sun.    I doodled a little more with black Pigment, white Gelly Roll & Sharpie pens.   I painted the house, flowers, cat & heart with Distress Inks on my craft mat with water & a brush.

 Stencils:  TCW (mini) Circle Explosion, Fleur DeLis, Cubist
                Panduro (Bricks)
                Huey's Masks - Circle Graph

Thanks for stopping by and have a great day,
Shirley

Monday, June 03, 2013

A Beautiful Day

Hello everyone, I hope you are doing well.

Chocolate Baroque has launched two gorgeous rubber stamp sets featuring Peacock images.   Each design is more beautiful than the next, I love them all.    My first design using these new stamps features a beauty from the Tangled Peacock set.


The background is created with Dylusions inks, TCW stencil - mini Fleur DeLis and Viva green gold modelling creme.  I sprayed water over the stencil in the bottom left corner and blotted with a towel to get the 'ghost' effect.  The beautiful Peacock was embossed with gold and I painted with Tombow markers.  I cut out the first one and stamped it a second time to decoupage the feathers and wing.  The sentiment is from Loving Sentiments.      I'm giving this card to a dear friend who is turning 90 this month!

Here is a look at the two new A4 (full page) sets.   They are on special offer during the month of June, with even a bigger discount if you purchase both since it will be so difficult to choose just one:)


Thanks for visiting and if you have time please visit the Chocolate Baroque DT to see the beautiful designs by my talented teammates.  You won't be disappointed !

Have a great day,
Shirley

Saturday, June 01, 2013

Raindrops must Fall

Happy Weekend!  I hope everyone is doing well.   We are 'enjoying' hot humid weather, much warmer than normal.   But I'm not sure what is normal anymore as our weather is so up & down.   Yesterday it was 37 (Celsius) with the Humidex factor.  We've also enjoyed some rain this week, our trees & gardens love it, everything is so lush.

I have a card today that I created by using stencils and Designs by Ryn's amazing Rain Drop Set.    If you are interested in buying Ryn's unique and high quality stamps please visit her Rubber Stamp Shop - she sells directly to customers around the world.     You will also find lots of inspiration at her Facebook Page or at the rest of the Design Team blogs that are posted on my side bar.


The background is created with Dylusions Inks, Distress Inks, Acrylic Paint (butterfly) and stencils.   I use Dylusions spray inks a lot as I have so much fun playing with them.    I  stamped the raindrops (2 sizes from the set) with black Stazon, painted them a little with Distress Ink (add to your craft mat & pickup with a wet brush) and highlighted with a white pen.  I doodled on the butterfly with black & white pens.


Stamps:  Design by Ryn's - Raindrop Set  (4 stamps)  
               Sentiment is from Chocolate Baroque's Loving Sentiments set.
Stencils:  TCW Mini Butterflies & Dylusions (Ranger) Dotted Flowers


Thanks for stopping by and enjoy the rest of the weekend!
Shirley