Sunday, September 29, 2013

Poinsettia Edges

Hello everyone,  I hope you are doing well.   I have a long post today so you might want a cup of something while you are reading :)

Chocolate Baroque has announced several new beautiful Christmas stamp sets:   Winter and Christmas Edges and Reindeer Landscape (which is the stamp of the month for October)

The following three cards all feature the Poinsettia Edge from Christmas Edges.   The new Edge stamps are fantastic, I love them (yes I know I say that about ALL of CB's designs, it's true I'm 'in Love').


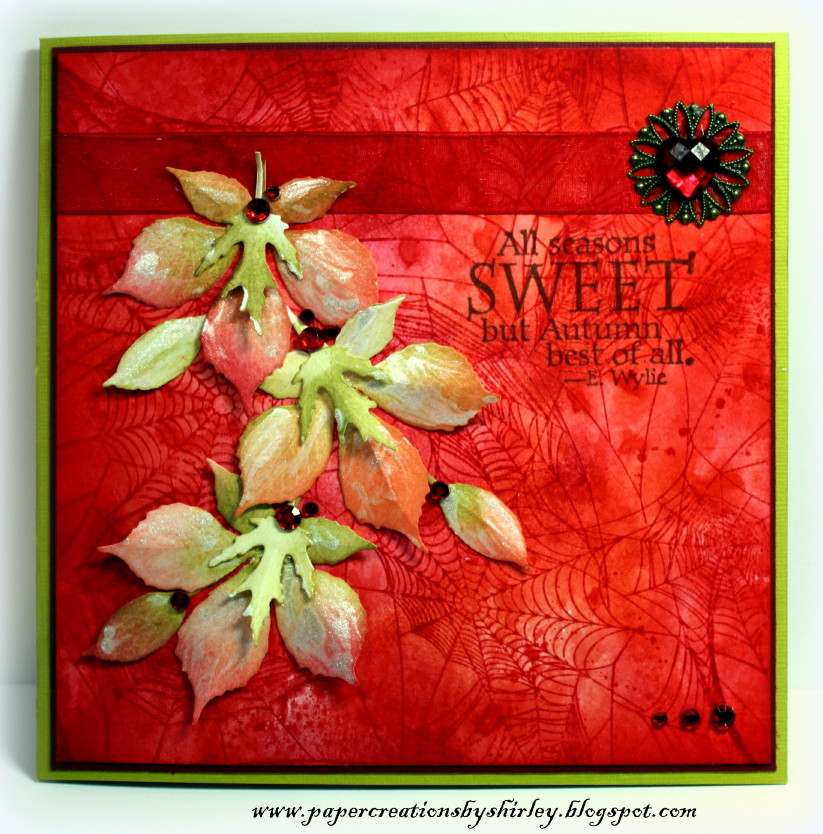
I started with Distress Inks (Festive Berries & Fired Brick) using the Acrylic Block technique.   I over stamped the background using the Mistletoe fragment (another favourite from Pears & Baubles ) with Festive Berries Distress Ink.      I embossed the Poinsettia edge from Christmas Edges along with JOY from Bold Christmas Words on separate cardstock with deep purple powder and coloured with Festive Berries Distress Ink using water & a brush.   I decoupaged all three images and adhered along with purple ribbon onto the background.  I also added lots of stickles in the flower centers.


While I was working with the Poinsettia Edge, I kept seeing leaves from the Bold Bloom and Tangled Garden sets in the petals.   I thought I would try to make a poinsettia from the leaves and below is what I came up with :)


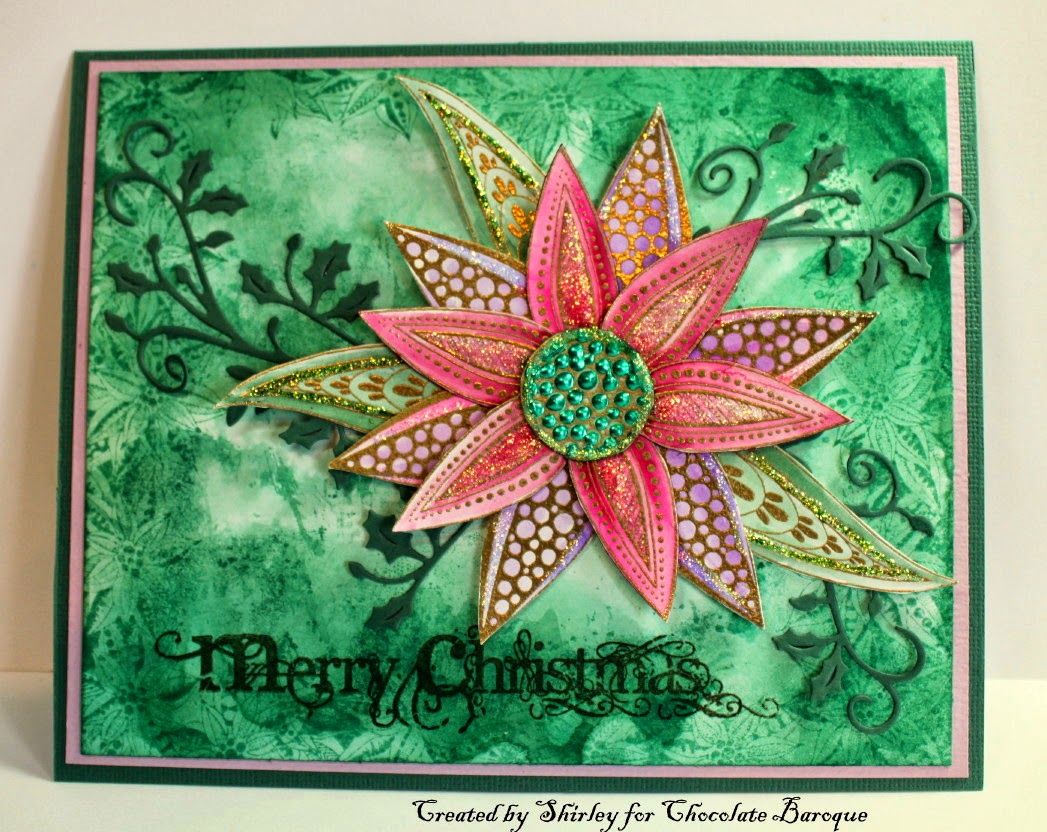
For the card above I started with Evergreen Bough and Pine Needles Distress Ink using the Acrylic Block technique.  I stamped around all the edges using the Poinsettia edge with Evergreen Bough Distress Ink.   Merry Christmas is from the fabulous Bold Christmas Words set.    The Holly Flourish die cut is Cheery Lynn B148.   I embossed the leaves from Bold Bloom & Tangled Garden with gold along with the flower center from one of the flowers from Tangled garden.  I painted the flower petals & leaves with Tom Bow markers and used lots of stickles on the petals & liquid pearls in the center.

When I was working on the card above my sweet handsome male cat (adopted from a shelter, it was also love at first sight) jumped up on my desk.  He frequently walks around my desks to see what I'm working on and then rolls around on top of my mess doing his 'cute act' to get my attention.  I cannot resist rubbing his furry belly & chin and he knows it :) 

My Furry Assistant


My last card for today was a 'quick make' as I used some glittery designer paper from my stash.


I stamped the Poinsettia Edge from Christmas Edges and Sentiment from Bold Christmas Words onto white cardstock with Memento Rhubarb Stalk Dye Ink.   I layered as shown and added a bow & stickles.  

Here is a look at the beautiful Winter Edges and Christmas Edges, available individually or as a multi-buy offer.


If you get a chance, please stop by CB's Design Team Blog to see what my talented teammates are up to.
  
Thanks for stopping by and have a great day!
Shirleyx

Thursday, September 26, 2013

Dance in the Moonlight

Hello everyone, I hope you are doing well.   

I have a 'spooky' Design today using using Chocolate Baroque's - Bewitched Moonlight set.


I started with a piece of water colour paper and sprayed Orange Dylusions Ink along with a little Black Dylusions.   I spritzed water over top and blotted with a paper towel roll.    The black toned down the orange a little for a spooky background.    I stamped the Gothic word fragment from Gothic Angels with Ripe Persimmon Distress Ink while the background was still damp.   When dry (I used a heat gun) I stamped the lace fragment from Lace Fragments

I stamped all images with Black Stazon.   I also stamped mushrooms from November Fairy, which I masked in a couple of spots.   I bleached the orange away from the mushrooms & moon with a natural hair brush and bleach.  Next I added purple Dylusions by using my craft mat,  brush & water.

I'll be back soon with new Christmas designs :)  Thanks for stopping by and have a great weekend!
Shirley

Monday, September 23, 2013

Feline Fairy

Hello everyone, I hope you had a great weekend.  Fall certainly has arrived here, it's cool and the days are getting shorter. 

I have a special Fairy design to show today :)   We love our two spoiled feline family members, so I was thrilled to see a Fairy Cat in the Autumn Fairy Collection by Chocolate Baroque.


The background was created with Water colour paints (wet on wet) and Dylusions spray inks.  When dry I stamped the Grasses from Floral Edges at the bottom and the Bubbles from Decorative Edges at the top with Peacock Distress Ink.

Next I embossed the Fairy Cat from November Fairy with WOW Black Glint.   I added stickles to her (or his) wings.     The rest of the images- the branch at the top & butterfly from November Fairy and the Floral Seed heads from September Fairy were stamped with black ink.   I added black liquid enamel to the seed heads which you can see better in the close-up below.    'Have a magical birthday' is from Fairyland Words.


Thanks for your visit and have a great day,
Shirley

Saturday, September 21, 2013

A Fairy and a Fantasy Meadow

Happy Weekend everyone! 

I have another design to show today using Chocolate Baroque's new gorgeous Autumn Fairy Collection .      I combined one of the Fairies with a fabulous scene from CB's Fantasy Meadow and the beautiful flourish tree from Fantasy Woodland.


The background started by spraying Dylusions inks - Midnight, Teal & Linen.   I stamped the flourish tree from Fantasy Woodland around the edges and also the mushroom from November Fairy with black Stazon Ink.   I bleached the ink from the mushrooms and painted with purple Dylusions.

The scene from Fantasy Meadow was embossed with black and coloured with my Tombow markers.  There is a pretty border around this image but I cut it off for this design and adhered it over the background.   The beautiful Fairy from September Fairy is coloured with Prisma pencils and decoupaged in front of the 'scene'.   I added stickles to her wings.


Thanks for your visit and have a great day,
Shirley

Wednesday, September 18, 2013

Autumn Fairies

Hello everyone, I hope you are doing well.

Chocolate Baroque has just introduced their Autumn Fairy Collection, the first of a series of Seasonal Fairy sets.  They are all so beautiful and a joy to work with.   

I have two cards today to show you using the three Autumn sets.    I'm on a 'blue theme' with these Fairies.


My background (above) started with texture using light molding paste with TCW - Cell Theory stencil and when dry, spraying Dylusions (purple & turquoise) inks.    I used images from all three Autumn sets, stamped with black Stazon Ink.   I masked the mushrooms, used bleach to remove the ink and added purple Dylusions.  I also added glitter around the texture.   The Fairy is from the September Fairy set which I stamped and embossed with black on separate card stock, decoupaged and adhered over the background.   I added pink stickles to her wings.   Wish upon a Star is from Words of Inspiration.


The background (above) is again using Dylusions spray inks (Midnight, Teal & Linen).   Using TCW - Circle Explosion stencil I sprayed more Linen ink.  I added a little pattern as well from TCW-Solace stencil using Shaded Lilac Distress Ink.    I stamped the bubbles from Decorative Edges with Peacock Feathers Distress Ink.

I used Black Stazon Ink for the rest of the stamping and also highlighted with a white Gelly Roll Pen.  The mushrooms were masked and bleached a little again.    The mushrooms, branches at the top & butterfly are from November Fairy and the Fairy is from September Fairy.   The interesting flower along the edges is from Poppy Meadow.  I painted the mushrooms and wings with Purple Dylusions & water.

Here is a look at the three DL(third sheet) sets that are available individually or as a multi-buy special.   Also for a limited time, if you purchase all three sets, Chocolate Baroque is offering their Autumn Fairy Inspirations Leaflet (digital download) free.    The leaflet features 'never been seen' designs by the DT with complete instructions and more.   

Also new are Fairyland Words available individually or as a group.

If you have a chance, please visit Chocolate Baroque's Design Team Blog, where you will find lots of inspiration from my talented teammates.

Thanks for stopping by and have a great day!
Shirley

Thursday, September 12, 2013

Blue Winter Wonderland

Hello everyone, I hope your week is going well.   Here in Ontario, Canada we've had a couple of days of record high temperatures and humidity so it's a bit strange to talk about Winter Wonderland.  In spite of the extended summer, I'm making great progress with Christmas cards for this year.

Chocolate Baroque recently released a fabulous clear stamp set - Bold Christmas Words.  I love them, the fonts are beautiful and the sizes are great to use as a focal point.     


I created the background using Dylusions Spray Inks - Teal, Midnight, Turquoise & White (spritzed with water & blotted with a paper towel roll).   I stamped the Big Bold Background - Snowflake Shadow with Salty Ocean & Seedless Preserves Distress Inks.    Winter Wonderland from Bold Christmas Words was stamped on a 'mop up' piece of watercolour paper and I used Spellbinder S5-015 to mat. 

Here is a look at the new clear Bold Christmas Words A5 stamp set.   Each stamp is also available for sale individually.

Thanks for stopping by and have a great day!
Shirley

Monday, September 09, 2013

Spooky Halloween Sky

Hello everyone & Welcome to the new followers!  Thank you to everyone for your interest in my blog and designs, I appreciate it very much:)

I have another Halloween Design using the wonderful new set - Bewitched Moonlight by Chocolate Baroque.     I experimented with using Acrylic paints in the background.


I started with red, orange & cream Acrylic Paints on my craft mat.  I spritzed with water and dragged my sheet through.  When dry, I stamped the fence with the tree image & sentiment from Bewitched Moonlight and the spider web looking fragment from Lace Fragments with black Stazon Ink.   I also embossed the fragment with Wow-Glamor Green powder (which has glitter and is much more vibrant in 'real').  I coloured the image a little with Inktense Pencils.

Thanks for stopping by and have a fabulous day,
Shirley

Saturday, September 07, 2013

"Zendoodles"

Hello everyone & Happy Weekend !

I have something different to show today :)   I've been learning Zentangle this summer as I've been admiring beautiful artwork on Pinterest and Blogs and have been wanting to give it a try.    I've been a 'doodler' forever and Zentangle is a wonderful extension.    I still need to practice and learn more, I can't remember the names of the patterns, but I love it.

I think this Journal Page is a combination of both Doodles & Zentangle.  Below is the cropped version which I like better, the lady seems more mysterious. 


I used a Acrylic paints & Neocolour II crayons to paint the face and Inktense pencils (love them!) to colour the tangles.

Below is the full page.


Thanks for stopping by and enjoy the rest of the weekend,
Shirley

Thursday, September 05, 2013

Autumn Leaves

Hello everyone, I hope your week is going well.

I'm playing along today in Impression Obsession's Challenge - Dies.  I've been wanting to try out my new Cover a Card - Spider Web along with these fabulous leaf dies for a while and below is what I came up with.

When I was in the Netherlands this past Spring, I saw many 'non-Halloween' card samples by Miranda at the Posthumas Stamp Shop using this Spider Web background stamp.  I fell in love with the texture & delicate design and realised that I 'needed'' it, but they were sold out.    I ended up ordering directly from IO while still on vacation and finally I've inked it up.


Impression Obsession Stamps:   CC141 CAC Spider Web & C3534 All Seasons (Quote)
Impression Obsession Die Set:  DIE030-S Leaves Die Set - (5 in the set)

I started with Festive Berries and Ripe Persimmon Distress Inks using the Acrylic Block technique (add inks to acrylic block or sheet, spritz with water and apply to paper) for the background.    I let it dry and then added the remaining ink which created the spots.    I really like how these two colours blended.     Next I stamped the Spider Web background with Festive Berries DI using IO's Mega Mount.

I die cut the leaves several times & using three from the set I made an arrangement over the background.    The dies are high quality, they cut like a charm.    I coloured them with Persimmon, Berries, Shabby Shutters & Peeled Paint Distress Inks.  I bent them a little to create more dimension and painted over top with Smooch Ink - Illuminate (which made it harder to photograph).  I added a charm and red rhinestones from my stash.

The quote is a favourite of mine as I love the Autumn Season.

Thanks for your visit and have a great day,
Shirley

Monday, September 02, 2013

If You can Dream It, You can Do It

Hello everyone, I hope you are doing well.    I would like to welcome more new followers, thank you so much, I appreciate everyone's interest, visits and kind comments.  You sure make blogging so much fun!

The Art Journal Journey Challenge for September is "Less is More".    While Clean & Simple is not where most of my designs seem to end up, I still love to see what people can create using this style and I enjoy the challenge of one layer LIM card designs. 

A LIM Journal Page is another challenge as my pages normally have layers of colours & designs which cover every inch of the page.   My interpretation of LIM for Art Journal pages was to leave some white space and I hope this qualifies as I'm joining this month's challenge :)


I sprayed Teal, Midnight & White Dylusions onto the background.   I spritzed a little water and tipped the page to let it run both up and down.   I added a little salt to create texture.    Using Distress Inks I added design with TCW stencils - Harlequin and Tiny Circles.

I stamped with Fabulous Flourish S5449 from Hero Arts (and it IS fabulous) and Bonnie (face) C4568 from Impression Obsession.  I am an Artist is from Chocolate Baroque's Artistic Affirmations and If you can Dream it you can Do it is from CB's Words of Inspiration.  

Thanks for stopping by and have a great day!
Cheers,
Shirley

Sunday, September 01, 2013

Bewitched Moonlight

Hello everyone and welcome to September !    I hope my fellow Canadian bloggers & visitors are enjoying the Labour Day weekend and ready for 'back to school' on Tuesday.  

I promised I would be back with new CB designs that celebrate another season...... and yes it's Halloween!  I love Autumn and Halloween is a fun part of it.  I love to see how some people go all out and decorate their homes to celebrate.  I like to have pumpkins out with our tall grasses to add a touch of Autumn to our front patio.

Chocolate Baroque has just announced two new wonderful rubber stamp sets for Halloween.    I've been working with Bewitched Moonlight which is a wonderful set to create spooky scenes for Halloween cards, tags and more.       


For the above card, I started with watercolour paper and sprayed Purple & Orange Dylusions Inks.  I spritzed water over top and was careful not to blend the colours as these two will turn into muddy brown together.  I blotted the ink with a paper towel roll.

When dry, I stamped the images from Bewitched Moonlight with black Stazon Ink.   I also stamped the Flourish Tree from Fantasy Woodland to the left of the mushroom and around the top edges.    Using a black Micron Pigment pen I drew a little on the bottom of the tree and added a few little mushrooms to blend the images together.    

Using a piece of cardstock with a circle cut out and placed over the witch, I carefully spritzed a little water, then blotted the ink off to create the moon.    Dylusions inks are water soluble, so it's easy to remove the ink.   I added holograph glitter to highlight the moon.

I have another design using the same stamp set:


I started again with a piece of watercolour paper and sprayed Midnight, Teal and White Linen Dylusions Inks.  I spritzed a little water over top, let the colours blend and blotted with a paper towel roll.   When dry, I used two stencils TCW Cell Theory (at the bottom)  and TCW Star Fall (at the top) with Distress Inks to create a little more pattern on the background.  Next I embossed the images with black powder.  I created a moon again using cardstock with a circle cut out and distress inks.

Here is a look at the complete Bewitched Moonlight set which is on special offer for the month of September along with it's partner set Nevermore.   Both sets are available for a multibuy price as well.   


I hope you've enjoyed these 'spooky' designs.    If you have a chance, please visit Chocolate Baroque's Design Team Blog to see what my talented teammates are posting.    Also you have a chance to win some of the new wonderful stamp sets -  all you need to do is leave a comment here at the DT Blog.

Thanks for stopping by and have a great day,
Shirley